Friday, June 18, 2010

Cherry Pielettes

It's odd. I've never liked cherry pie. Perhaps it's more accurate to say that I've never had a cherry pie that I liked. Talking to mom, we came to the conclusion that they're usually too sweet and gooey. Yuck. Nevertheless, when I saw people coming through the checkout with pints of local, organic Hartland cherries last night, I had to have some too. And I bought them with the intention of making little cherry pies.
To avoid the too sweet, too gooey quagmire, I decided to approach my cherry pies as I would an apple pie. I used about half of the amount of sugar called for and omitted the quick-cooking tapioca entirely. Instead, I used a bit of lemon juice, a couple tablespoons of flour, and as I said a fraction of the sugar. These modifications produced the desired effect, the only complaint being that there wasn't quite enough filling. A happy problem and an easy one to fix.

Cherry Pielettes

makes 6 3-inch pies

  • 1 recipe pie crust (you'll have extra)
  • 1 1/2-2 cups cherries, pitted and quartered
  • 1 Tbs. lemon juice
  • very scant 1/2 cup sugar
  • 2 Tbs. flour
  • Make pie dough and refrigerate at least one hour before rolling. Pit and quarter the cherries. Add the lemon juice, sugar, and flour, mix to combine and set aside.
  • Preheat oven to 450°F.
  • Roll out half the dough, leaving the other half in the fridge, and line 6 3-inch tartlette pans. Refrigerate the lined pans while you roll out the other half of the dough. Fill the pie shells with cherries, leaving behind some of the juices that will have formed. Dot the top of each pie with butter. Cut strips of dough with a fluted pastry wheel from the rolled out dough. Weave a lattice on top of the cherry filling and trim the edges. Brush the tops with an egg/cream wash.
  • Bake at 450°F for 7 minutes. Reduce to 350°F and bake an additional 30-35 minutes, until crust is golden and fruit is bubbling.
  • Cool in pans on wire racks for 15-20 minutes. When you feel it is possible, turn pies out of pans and return to racks. Serve warm or at room temperature.

Thursday, June 10, 2010

Chocolate Macarons

I know it's been a long time. Far too long. While I was away I learned a devastating truth: I cannot make chocolate chip cookies. I can manage perfectly flaky croissants. I'm fine with pie crust. I can bake brioche. Biscotti: not a problem. Allow me to make you puff pastry. But good ol' chocolate chip cookies are apparently beyond me. To console myself, and although I always say my next post will be a savory, I got up this morning and made chocolate macarons. And they're divine.
They have a perfect meringue crust giving way to a pleasantly chewy center. The ganache is as ganache should be: rich beyond rich and like silk on the tongue. The points may not have smoothed out as much as I would have liked, but when I opened the oven and saw perfect collars around every macaron, I was elated.
Macarons were once near the top of my baking intimidation list. After two successful attempts, they have fallen off it. I hope you too can experience the euphoria these little cookies can offer when they work.

Chocolate Macarons

Makes 18 2-inch sandwiched macarons

  • For the macarons:
  • 200 g confectioners' sugar
  • 95 g almond flour
  • 40 g cocoa powder
  • 130 g egg whites (about 4), room temp
  • 130 g granulated sugar
  • Blank
  • For the ganache filling:
  • 1/2 recipe basic ganache
  • 1 Tbs. soft butter
  • 1 1/2 Tbs. Cointreau
  • For the macarons: Line several baking sheets with parchment and set aside. Alternately you can line one baking sheet with parchment and set three other sheets of parchment on your work surface. If you find it helpful, which I do, draw circles the diameter you desire your cookies to be on the parchment.
  • Place the confectioners' sugar, almond flour, and cocoa in the bowl of a food processor and process until there are no lumps and the cocoa is evenly distributed. Set aside. Place the egg whites in the bowl of a stand mixer. Using the whisk attachment, beat the whites on low speed until they are frothy. Increase the speed to medium high and when whites start to hold shape, gradually add the granulated sugar. Continue to whip until whites hold stiff peaks. Using a rubber spatula, fold the almond-sugar-cocoa mixture into the whites in two parts until no streaks of white remain.
  • Transfer the batter to a pastry bag fitted with a medium-large plain tip and pipe mounds of batter into the circles drawn on the parchment. Allow to stand for one hour. Half an hour before the first batch goes into the oven, preheat oven to 350°F. Bake for 15 minutes. Transfer immediately to wire racks to cool. Allow the oven to reheat, transfer your second piece of parchment to the baking sheet and bake 15 minutes. Repeat until all the macarons are baked.
  • For the ganache filling: While the cookies are awaiting the oven, make the ganache. After the cream is fully incorporated, add the butter and process for a few seconds. Add the Cointreau and process a few seconds longer. Transfer ganache to a bowl and refrigerate until pipable, stirring occasionally to allow for even cooling and to prevent a skin from forming.
  • To assemble: When the cookies are fully cooled and the ganache is thick enough to pipe, pipe a dollop of ganache onto the bums of half the macarons. Sandwich with the remaining cookies.

Saturday, May 29, 2010

Grapefruit Arak Sorbet

On our first night in Jerusalem, Y.'s cousins took us to Mahane Yehuda, a restaurant sharing both a name and a neighborhood with the shuk. I was introduced to many things that evening, not least of all Israeli negotiation and perseverance: The table our party of five was led to after waiting next to an empty one for 45 minutes was upstairs in a dark corner and set for four. H. was not impressed and she had no qualms about letting the maître d' know as much. She asked why we couldn't be seated at the table downstairs, which had been free since we got there and big enough for our party. The reply was that it was reserved for a party of six. M. and Y. backed H. up saying that the table the maître d' wanted us to sit at wasn't nearly big enough to accommodate us. The reply this time was that it certainly was big enough--they sometimes even sat parties of six at this table. Thus the maître d' sank her own ship and at H.'s suggestion we were led back downstairs to the empty table, which happened to have an excellent view of the open kitchen and the spontaneous speeches and singing and dancing to come, and left the four top to the as-yet-unseen party of six.
But the relevance of our night at Mahane Yehuda to this post is the grapefruit and arak cocktail that was served upon our arrival at the restaurant before the table debacle and well before the restauranteur from Tel Aviv began speechifying and the waiters commenced drinking and the chef put on his fez and started dancing and waving a dish towel over his head to a song whose lyrics loosely translate to, "I want to be out there in the jungle where there is no Rabbi Google." This refreshing citrus-anise cocktail appeared several times during our stay in Israel sometimes with a sprig of mint, sometimes blended with ice, always absolutely delicious. It is at Y.'s suggestion that I turned it into grapefruit arak, although I couldn't find any and had to use ouzo, sorbet, a perfect accompaniment to the unusually hot days we have had this spring and the many we are bound to encounter come summer.

Grapefruit Arak Sorbet

makes one quart

  • 3 cups fresh-squeezed grapefruit juice (about 9 grapefruit)
  • 1/2 cup sugar
  • 1/3 cup water
  • 1/3 to 1/2 cup arak (or ouzo or pernod), chilled
  • Make a simple syrup with the sugar and water by dissolving the sugar in the water and cooking it on medium heat until clear. Add syrup to grapefruit juice and chill until very cold.
  • Freeze grapefruit-syrup mixture in an ice cream maker according to the manufacturer's instructions. After 10-15 minutes slowly add the arak/ouzo/pernod. Continue to freeze until mixture becomes slushy, another 10 minutes or so. Transfer to airtight containers and place in the freezer for several hours.

Friday, May 21, 2010

A Garden

I've never had a garden before and finding myself part steward of Y.'s this year while he fries bigger fish is, frankly, a bit overwhelming. I don't know what I should put where or when or how close together or how deep or with what companion or in how much sun or during which phase of the moon. At least I know I don't have to take it for twice daily walks. Y. assures me that I can do no harm and the important part is just to be out there doing a bit at time and eventually there will be a garden.
Y. always says there is no time for resting on one's laurels and that seems particularly true in gardening. I was proud of the job I did waking the garden up after the winter. Six hours of clearing pathways and pulling dock and grass and who-knows-what-all left beautiful mounds of soil standing out against the woods. And then I didn't do anything for a good two weeks and the weeds came back as weeds will and I thought, "Right, Em, no resting on your laurels."
I should be out there now weeding and turning soil and planting seeds and telling the plants to grow, although they seem to manage that all by themselves. That is the exciting part. I put seeds in the ground, give them some water, and by some miracle a few days later there are little green shoots coming through the dirt. It's exciting and that's before there's even anything to eat.
It is thrilling to see the asparagus coming up (even though I know we aren't allowed to eat it until next year) or to see flowers on the strawberries that weren't there the day before or to look out the window and be able to make out rows of tiny beets and peas or to eat the first radish of the season. I used to think seeing local produce at the farmers' market was fun, and it is, but seeing it in your own back yard is so much better. I'm still afraid I'm doing things all wrong, but with each new shoot I am gaining confidence that I won't ruin the garden and that we might even have food to put up come fall.

Friday, May 14, 2010

Rhubarb Cake

It is with great pleasure that I announce that at long last the local rhubarb est arrivé! Or it did a week or so ago when I wasn't looking. In any case the 'Oregon' sign on the rhubarb basket has been replaced with a sign showing a map of Vermont and a little star indicating the approximate location of Dwight Miller Orchards, just a few miles from where I sit.
There are a thousand things you can do with this pink, tart stalk. You can make compote or cobbler, tarts or pies, a sauce for fish, a filling for danish, jellies or jams... or you could make a rhubarb cake.
I'll be honest: this is not my favorite rhubarb recipe. There's nothing wrong with it really, but I am not a fan of undercooked batter and the high moisture content of the rhubarb prevents the batter around it from cooking completely. Either that or I took the cake out of the oven ten minutes too early, which is entirely possible even though my toothpick came out clean. I do like the texture the cornmeal lends the cake--its slight crunch contrasts well with the softness of the rhubarb. And the flavor is good. The tartness of the rhubarb keeps the cake from being too sweet and there's just enough cinnamon to be noticed but not enough to be overpowering. So, who knows, maybe the problem is me and not the cake and I should try again before pronouncing my verdict.

Rhubarb Cake

adapted from Nigella Lawson

  • 18 oz. rhubarb
  • 1 cup sugar
  • 1 cup flour
  • 1/2 cup plus 2 Tbs. fine cornmeal
  • 1 tsp. baking soda
  • 1/4 tsp. salt
  • 1 tsp. ground cinnamon
  • 2 large eggs
  • 1 tsp. vanilla
  • 1/2 cup butter
  • 1 cup plus 2 Tbs. yoghurt
  • Preheat oven to 350°F. Butter and flour a 9-inch spring form pan and set aside.
  • Clean and trim rhubarb if necessary, then cut into 1/2 inch pieces and place in a medium bowl. Sprinkle 1/3 cup of the sugar over the rhubarb and set aside.
  • In another bowl, combine the flour, cornmeal, soda, salt, and cinnamon. Beat the eggs with the vanilla. In large bowl cream the butter and remaining 2/3 cup sugar. Gradually add the egg mixture to the creamed butter, beating well. Alternately add the flour mixture and yoghurt, mixing just to combine after each addition. Finally, fold in the rhubarb, sugar, and any juices that might be in the bowl.
  • Pour batter into prepared pan and bake about one hour. Cover the top with foil if it starts to get too dark.
  • Allow to cool in the pan for a few minutes and then turn out onto wire racks.

Friday, May 7, 2010

Pizza on the Grill

I understand that when most people make pizza on the grill, they make pizza on the grill. With nothing between the pizza and the grill. You might think that if you're going to put a pizza stone on the grill, you could just as easily bake your pizza in the oven. And you're probably right. But there are two or three reasons that still convince me it's a good idea. Maybe you don't want to deal with the hassle of flipping the crust, but you still want a bit of that smoky, grill flavor. Put a stone on the grill. Say your boyfriend lives in a one-room cabin in the woods and doesn't have an oven and you're still determined to make pizza. Put a stone on the grill. Or if it's the middle of summer and it's a kazillion degrees out and you'd rather not fire the oven up to four-fifty. Put a stone on the grill.

Basic Pizza Dough

Adapted from Marcella Hazan

  • 3/4 tsp. active dry yeast
  • 1/2 cup lukewarm water
  • 1 1/2 cups plus 2 Tbs. bread flour
  • 1 1/2 tsp. olive oil
  • 3/4 tsp. salt
  • cornmeal for dusting the peel
  • Sprinkle yeast over 1/8 cup of the water and set aside for about 10 minutes, or until yeast is dissolved. Once the yeast has dissolved, add 1/2 cup of the flour and mix thoroughly. While still mixing, add the olive oil, salt, another 1/8 cup of the water, and 1/2 cup of the flour. Continue to alternately add the water and flour until a manageable, soft, but not sticky dough forms.
  • Knead dough for 10 minutes until soft and silky. Lightly grease a clean bowl with olive oil. Form the dough into a ball, place it in the bowl, cover, and allow to rise until it has doubled in volume, 2-3 hours.
  • Start heating the grill with the pizza stone on it about 1/2 hour before you're ready to bake.
  • Dust a peel or baking sheet generously with cornmeal. Punch down the dough and form it into a circle with a rolling pin or your hands or by any means that suit you. Place formed dough onto dusted peel or baking sheet. Put the toppings of your choice on the dough, leaving a bit of an edge.
  • If using a gas grill, turn off the fire that is directly below the pizza stone, leaving lit the fires to the sides. Using jerking movements and possibly a spatula, slide your pizza onto the stone. Close the lid and allow to bake about 20 minutes, or until the dough is a light golden brown.
This was my first attempt, naturally, and I learned one very important lesson. Make sure there is no fire directly below the stone once the pizza goes on it. If there is, the bottom is likely to burn. I'm happy to have burned a pizza so you don't have to so long as you get outside and put a stone on the grill.

Thursday, April 29, 2010

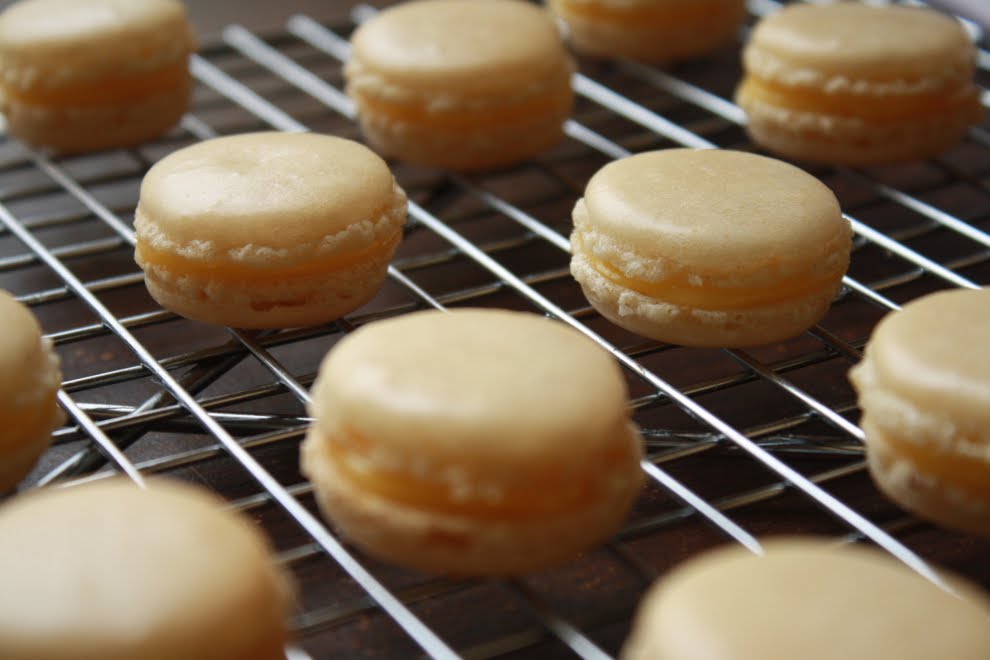
Lemon Macarons

If you made the cheesecake below, you might be wondering what to do with all those egg whites and all that leftover lemon curd. Maybe you already made lemon meringue tartlets. If not, you could try making macarons. I should warn you, though: if they work you'll be overcome with baking euphoria, if not... not. You decide whether it's worth the risk.
The first time I attempted to make macarons, it was a macaron massacre. I aged the egg whites like the recipe told me to and heated the syrup to so-many degrees before drizzling it down the side of the bowl while the whites were whipping and folded in the almonds and sugar just so and piped and waited and baked and then... they were lop-sided and hollow and just plain wrong. I was despondent for the rest of the day. This time I felt like I cheated somehow by making them with French meringue instead of Italian, but when I opened the oven and saw the perfectly shiny domes and frothy little collars, I didn't mind quite so much.
I hope your audience is as appreciative as mine was. I took my macarons to work with me and was positively regaled with praise. "They look like little hamburgers," S. said, "but taste like lemon meringue pie!" Another co-worker said, "I don't know what those are, but I want the recipe." Well, here it is.

Lemon Macarons

adapted from The Fundamental Techniques of Classic Pastry Arts

  • 115 g almond flour
  • 200 gconfectioners' sugar, sifted
  • 90 g egg whites, room temp
  • 8 g confectioners' sugar, sifted
  • 1/2 tsp. almond extract
  • lemon curd
  • Line a baking sheet with parchment or a silicone mat and set aside.
  • Place the almond flour and 200 g sugar in a food processor and process for about a minute. Set aside.
  • Place the egg whites in the bowl of a stand mixer fitted with the whisk attachment and beat on low until whites are foamy. Add the sugar and beat on high to the soft peak stage, being careful not to over-whip.
  • Remove bowl from stand and fold in the almond mixture and almond extract using a rubber spatula. Transfer batter to a pastry bag fitted with a medium round tip.
  • Pipe rounds of batter onto the parchment lined baking sheet, leaving enough room between them for the batter to spread slightly. Make the rounds any size you want so long as they're all the same size. If it helps, you can even draw circles on the parchment as guides.
  • Let the uncooked macarons sit for about an hour before baking. They will form a skin, which will help them keep their shape during baking. Preheat the oven to 325°F. Bake for about 10 minutes, or until firm and just beginning to brown around the edges.
  • Immediately transfer macarons to wire racks to cool. Once cool, pipe a mound of lemon curd on half the macarons and sandwich them with the other half, pressing them together to squeeze the filling to the edges.