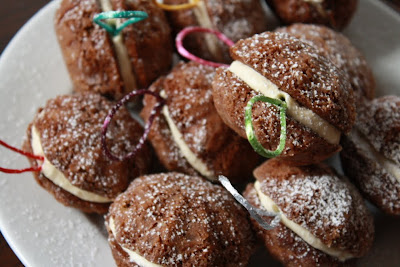
These are bordering on too cute, even for me, but when I saw the mold pan at the hospice thrift for only two dollars, I couldn't resist. My initial thought was to stack the small cakes somehow, or serve them drizzled with custard, but then at work it struck me: stick them together with buttercream and make them look like Christmas ornaments! And I think it worked.
I had some raw cream turning itself into crème fraîche in the fridge so I decided to try Nigella Lawson's Sour Cream Chocolate Cake. I know that sour cream and sour cream are not the same thing necessarily, but the cakes didn't seem to mind. They came out moist and rich and chocolaty and dense enough to really sink your teeth into. I want everything to have a warm, spicy flavor this time of year, so I ground up some of the Chai Walla's chai spice--a mixture of cardamom, cinnamon, cloves, ginger, and peppercorns--and added it to the batter.
Chocolate Chai Spice Ornaments
cake recipe adapted from Nigella Lawson
- 1 1/3 cups flour
- 3/4 cup sugar
- 3/4 tsp. baking powder
- 1/4 tsp. baking soda
- 1/2 tsp. salt
- 1 1/2 tsp. ground chai spice
- 3/4 cup plus 2 Tbs. butter, room temp.
- 3 Tbs. cocoa powder
- 1/2 cup plus 2 Tbs. sour cream
- 2 large eggs
- 1 1/2 tsp. vanilla extract
- blank
- 1 1/8 cups confectioners' sugar
- 5 Tbs. butter, room temp.
- 1 1/2 tsp. milk
- 1/4 tsp. vanilla
- Preheat oven to 350°F. Butter and flour small cake molds and set aside.
- Combine flour, sugar, baking powder, baking soda, salt, and chai spice in the bowl of a stand mixer. Add the butter and, using the paddle attachment, incorporate it into the flour mixture. In another bowl or a quart measuring pitcher, whisk together the cocoa, sour cream, eggs, and vanilla. Add slowly to the flour mixture and beat until thoroughly mixed.
- Half-fill each mold with batter. Bake for about 15 minutes, or until a toothpick comes out clean. Turn cakes out onto a cooling rack. Rinse, re-butter-and-flour the molds and bake more cakes if necessary.
- For the buttercream: using a fork and then a whisk combine ingredients and beat until smooth and pale.
- When cakes are cool, trim the humps off the surface that is supposed to be flat. Spread a heaping teaspoon (or so) of buttercream on the flat side of one cake and then sandwich it with another cake. Press cakes together gently but firmly so the buttercream reaches the edges. Repeat with remaining cakes.
- If the buttercream is very soft refrigerate the sandwiched cakes until it is firm. Cut small lengths of satin ribbon and push the ends into the buttercream using a skewer or toothpick or any other small pointed object. Alternately, you could press the ribbon into the buttercream before sandwiching the cakes. If the ribbon is long enough and you let the frosting harden, they might actually be functional. I don't know not having tried, but it's worth a go.
- Arrange ornaments on a serving plate and dust with confectioners' sugar.
Makes one dozen ornaments.
I am not a fan of either inedible or nonfunctional decoration, so the ribbons, while pretty, were a bit of a disappointment. Next time I'll either make ribbons out of sugar, or attach the satin ribbons in such a way that they will be able to bear the weight of the cakes. And if it doesn't work, oh well, because the ribbons really are pretty.
You might find that your cakes look a little chewed up when you turn them out of the molds, but don't let this upset you (I almost bagged the project after turning out my first batch of cakes). I find that a dusting of powdered sugar lends seasonal charm and gracefully disguises any number of sins.


No comments:
Post a Comment