Showing posts with label Christmas. Show all posts

Wednesday, December 23, 2009

A Festive Loaf

This is actually a Russian Easter bread called kulich, but the 'panettone' entry in the index of Andrew Whitley's Bread Matters sends you to the same page. It had all the right ingredients--flour, yeast, milk, fruit, peel, nuts, sugar--so I thought I'd give it a try. The result was a very small, but very festive loaf. If you plan to bake this recipe, I suggest making at least two, but more like four or eight loaves at a time. It's just too much work and waiting for only one.
This bread is one of the more wholesome things I've baked this month. The whole wheat flour gives the bread some substance, though it's still very soft and not at all dense, and the sugar is kept to a minimum. I used my quince brandy to soak the fruit and the flavors of cinnamon and star anise came through nicely.

A Festive Loaf

adapted from Andrew Whitley

  • 60 g raisins
  • 50 g slivered almonds
  • 40 g candied mixed peel
  • quince brandy to cover
  • blank
  • 5 g sugar
  • 2.5 g active dry yeast
  • 60 g milk, warm
  • 50 g whole wheat flour
  • blank
  • 30 g sugar
  • 70 g white bread flour
  • 40 g whole wheat flour
  • 1 egg, beaten
  • ferment, from above
  • 50 g salted butter, softened
  • The night before you're going to bake, combine the raisins, almonds, peel, and brandy (or rum, or vodka, or fruit juice) in a jar. Cover, shake, and set aside.
  • Get out your paper panettone cases and set aside, or prepare an improvised version. Line the sides of a 5-inch cake pan with heavy brown paper about 6 inches tall. Then line the bottom and (now high) sides of the cake pan with parchment paper.
  • For the ferment: Dissolve sugar and yeast in the warm milk. Mix in flour to make a paste. Cover and put in a warm place to rise and fall, about an hour.
  • To make the dough: Combine flours and sugar then add egg and ferment. Mix to form a dough. Knead for a minute or so to fully combine, then knead in the butter. Your dough will become very soft and sticky, but do not add any more flour. Keep kneading and after about 10 minutes you will have a soft, but coherent dough. Alternately, you could knead the dough using the dough hook attachment on you mixer.
  • Form dough into a ball and place in a small greased bowl. Cover with plastic and leave to rise in a warm spot for about an hour.
  • Drain any excess liquid from your fruit-nut mixture and gently fold/knead into the dough. Allow the dough to rise for another half hour.
  • Carefully shape the dough so the top is tight, smooth, and unbroken, removing any bits of fruit or nut that might be sticking through the top. Place in baking case. Allow to rise to maximum expansion, about a half hour longer.
  • Bake at just over 350°F for 30-40 minutes, or until the top is nicely browned and a thin skewer inserted into the loaf comes out clean.
This slice is pictured plain--I wanted you to see the golden raisins and bits of almond--but it's much tastier with butter. It might be better yet toasted and spread with butter. In any case it's perfect for tea or coffee and I'm sure the loaves wrap quite well in brown paper and string to give to friends and neighbors.

Monday, December 21, 2009

Starry Mince Pies

Well, it's the Monday before Christmas so if you haven't already made your mincemeat, it's too late. It is the perfect time to start giving pies away, though, so happy baking to those of you who got your mincemeat made in time.
These were made using a mini muffin tin and a small star cookie cutter. No need to wet the edges to stick the stars down as the mincemeat holds them on and the egg wash helps too.
Wishing you moments of calm this week and best of luck in the kitchen.

Wednesday, December 16, 2009

Orange Meringues with Chocolate Ganache

I never think to make meringues. That is, I never think to make meringues unless I've made custard first and have a bowlful of leftover whites staring at me with their big doe eyes daring me to pour them down the drain. But aren't these gorgeous? Wouldn't you love to part the tissue paper and find these inside? They're worth separating eggs for, friends, and making custard with the leftover yolks.
Martha wanted these made with peppermint extract and red food coloring, but I had in my cupboard orange extract and orange food coloring. Orange and chocolate are two flavors I think go together very well and are just as seasonally appropriate as peppermint and chocolate, so I thought the substitution a fair one.

Orange Meringues with Chocolate Ganache

adapted from Martha Stewart

  • 3 egg whites
  • 3/4 cup sugar
  • 1/2 tsp. orange extract
  • orange food coloring
  • blank
  • 1 cup heavy cream
  • 6 oz. dark chocolate
  • Preheat oven to 175°F. Line baking sheets with parchment or silicon mats and set aside. Fit a pastry bag with a small star tip and set aside.
  • Put egg whites and sugar in the bowl of an electric mixer. Place bowl over simmering water and stir until sugar has dissolved and mixture is warm. Fit bowl onto base of electric mixer and, with whisk attachment, beat mixture until whites are shiny and hold stiff peaks, mixing in orange extract just before they have reached this stage.
  • Paint 3 stripes of food coloring on the inside of the pastry bag. Place stiff egg whites in pastry bag and pipe as many small meringues as you can. Bake for about 1 hour and 40 minutes, or until crisp and dry, but not brown. Allow to cool completely(this doesn't take long).
  • For the ganache: cut the chocolate into small pieces and then grind into even smaller pieces in a food processor. Bring cream just to the simmer over medium heat. Add cream to food processor and process until ganache is smooth, 20 seconds or so. Transfer to a bowl and allow to cool until it is pipeable.
  • To assemble: Fit a pastry bag with a small round tip and put ganache in bag. Pipe some ganache on the bottom of one meringue and sandwich it with another, repeat. Place finished meringues on wire racks. Allow ganache to set about 30 minutes. Will keep in airtight containers at room temperature for about 2 days.
Indeed, it was more than fair; it was meant to be. The orange is sweet and high and the bitterness of the dark chocolate brings it back down to earth. This is mimicked by the contrasting textures: the airy lightness of the meringue is countered and complimented by the richness of the ganache. Although the meringue melts almost instantly--disappears well before you've finished the ganache--the orange flavor lingers and mingles with the chocolate, giving your entire mouth something to think about.
I kept the meringues small for several reasons. Mainly I think they're prettier that way. Just as importantly, they're twice as big when two are stuck together and I wanted the finished product to be able to be popped in the mouth and enjoyed in one bite. At this size they're small enough to fit on the saucer of an espresso cup--a nice presentation and an excellent accompaniment. You also get more this way, which can only be a good thing.

Tuesday, December 8, 2009

Chocolate Chai Spice Cake Ornaments

These are bordering on too cute, even for me, but when I saw the mold pan at the hospice thrift for only two dollars, I couldn't resist. My initial thought was to stack the small cakes somehow, or serve them drizzled with custard, but then at work it struck me: stick them together with buttercream and make them look like Christmas ornaments! And I think it worked.
I had some raw cream turning itself into crème fraîche in the fridge so I decided to try Nigella Lawson's Sour Cream Chocolate Cake. I know that sour cream and sour cream are not the same thing necessarily, but the cakes didn't seem to mind. They came out moist and rich and chocolaty and dense enough to really sink your teeth into. I want everything to have a warm, spicy flavor this time of year, so I ground up some of the Chai Walla's chai spice--a mixture of cardamom, cinnamon, cloves, ginger, and peppercorns--and added it to the batter.

Chocolate Chai Spice Ornaments

cake recipe adapted from Nigella Lawson

  • 1 1/3 cups flour
  • 3/4 cup sugar
  • 3/4 tsp. baking powder
  • 1/4 tsp. baking soda
  • 1/2 tsp. salt
  • 1 1/2 tsp. ground chai spice
  • 3/4 cup plus 2 Tbs. butter, room temp.
  • 3 Tbs. cocoa powder
  • 1/2 cup plus 2 Tbs. sour cream
  • 2 large eggs
  • 1 1/2 tsp. vanilla extract
  • blank
  • 1 1/8 cups confectioners' sugar
  • 5 Tbs. butter, room temp.
  • 1 1/2 tsp. milk
  • 1/4 tsp. vanilla
  • Preheat oven to 350°F. Butter and flour small cake molds and set aside.
  • Combine flour, sugar, baking powder, baking soda, salt, and chai spice in the bowl of a stand mixer. Add the butter and, using the paddle attachment, incorporate it into the flour mixture. In another bowl or a quart measuring pitcher, whisk together the cocoa, sour cream, eggs, and vanilla. Add slowly to the flour mixture and beat until thoroughly mixed.
  • Half-fill each mold with batter. Bake for about 15 minutes, or until a toothpick comes out clean. Turn cakes out onto a cooling rack. Rinse, re-butter-and-flour the molds and bake more cakes if necessary.
  • For the buttercream: using a fork and then a whisk combine ingredients and beat until smooth and pale.
  • When cakes are cool, trim the humps off the surface that is supposed to be flat. Spread a heaping teaspoon (or so) of buttercream on the flat side of one cake and then sandwich it with another cake. Press cakes together gently but firmly so the buttercream reaches the edges. Repeat with remaining cakes.
  • If the buttercream is very soft refrigerate the sandwiched cakes until it is firm. Cut small lengths of satin ribbon and push the ends into the buttercream using a skewer or toothpick or any other small pointed object. Alternately, you could press the ribbon into the buttercream before sandwiching the cakes. If the ribbon is long enough and you let the frosting harden, they might actually be functional. I don't know not having tried, but it's worth a go.
  • Arrange ornaments on a serving plate and dust with confectioners' sugar.
I am not a fan of either inedible or nonfunctional decoration, so the ribbons, while pretty, were a bit of a disappointment. Next time I'll either make ribbons out of sugar, or attach the satin ribbons in such a way that they will be able to bear the weight of the cakes. And if it doesn't work, oh well, because the ribbons really are pretty.
You might find that your cakes look a little chewed up when you turn them out of the molds, but don't let this upset you (I almost bagged the project after turning out my first batch of cakes). I find that a dusting of powdered sugar lends seasonal charm and gracefully disguises any number of sins.

Thursday, December 3, 2009

Chocolate Hazelnut Cups

Don't these just say Christmas party all over them!? The golden glow of the candy, the silvery sparkle of the foil--one gets one's light where one can this time of year--the dark, velvety ganache studded with bits of hazelnut all contained in a dark chocolate cup: divine.

Chocolate-Hazelnut Cups

adapted from Farmhouse Cookery, makes 2 dozen

  • For the cups:
  • 3 oz. dark chocolate
  • 24 1-inch candy cups
  • blank
  • For the ganache:
  • 8 oz. dark chocolate
  • 1/4 cup heavy cream
  • 1 Tbs. butter, at room temp.
  • 2 Tbs. brandy
  • 2 oz. ground hazelnuts
  • blank
  • To decorate:
  • 1 1/2 cups sugar
  • 3/8 cup water
  • 30 (just in case) hazelnuts, toasted and peeled
  • For the cups: Arrange the candy cups (sweet cases according to the Farmhouse) on a baking sheet. Chop up the chocolate and place 2/3 of it in a double boiler. Melt over simmering water. Just before it is smooth take the chocolate off the heat and add the remaining chopped up chocolate. Stir, off the heat, until smooth. Line the cups with the chocolate by filling the cup up halfway with chocolate and then either swizzling the chocolate around until the entire cup is coated or using a teaspoon to spread the chocolate around and up the sides. Make sure the sides are thick enough or your cup will fall apart when it is unwrapped. Place in the refrigerator until fully hardened.
  • For the ganache: Chop up the chocolate, then place in a food processor and whiz into very small bits. Heat the cream until bubbles form around the edges. Add to chocolate and process until mostly smooth. Transfer chocolate mixture back to the pan and add butter. Stir until smooth. Add the brandy and hazelnuts and mix until combined. Allow ganache to cool until pipable.
  • For the decoration: Stick each hazelnut on a skewer with the top of the hazelnut pointing down when the skewer is held parallel to the floor. Prepare an ice bath that can accommodate your pan. Combine sugar and water in a small, heavy-bottomed pot over medium heat, stirring until sugar is COMPLETELY dissolved. Bring mixture to a boil and heat to just below hard crack, about 300°F, wiping the sides of the pot down with a wet pastry brush to prevent crystals from forming and ruining your syrup. When the desired temperature is reached, plunge pot in ice bath to stop the cooking. Remove and let cool until a skewer dipped into and then pulled out of the sugar leaves a thread trailing behind it. One by one, dip the hazelnuts in the syrup and pull them out. Let any excess sugar drip back into the pan. Cut the thread with scissors when it has stopped dripping and secure the skewer with the tip of the hazelnut pointing down between the counter and a breadboard. Allow to cool and harden completely. If the candy in the pot becomes too hard to work with, put it over low heat until it liquifies enough for dipping.
  • To assemble: Take chocolate cups from fridge. Transfer ganache to a pastry bag fitted with a medium-sized star tip. Pipe ganache into cups and top with hazelnut drops.
You might be tempted to make these larger, but in this case more of a good thing would just be too much. Like this they're a single mouthful of heart melting decadence without the sinful edge.

Sunday, November 29, 2009

Gingerbread Cut-Out Cookies

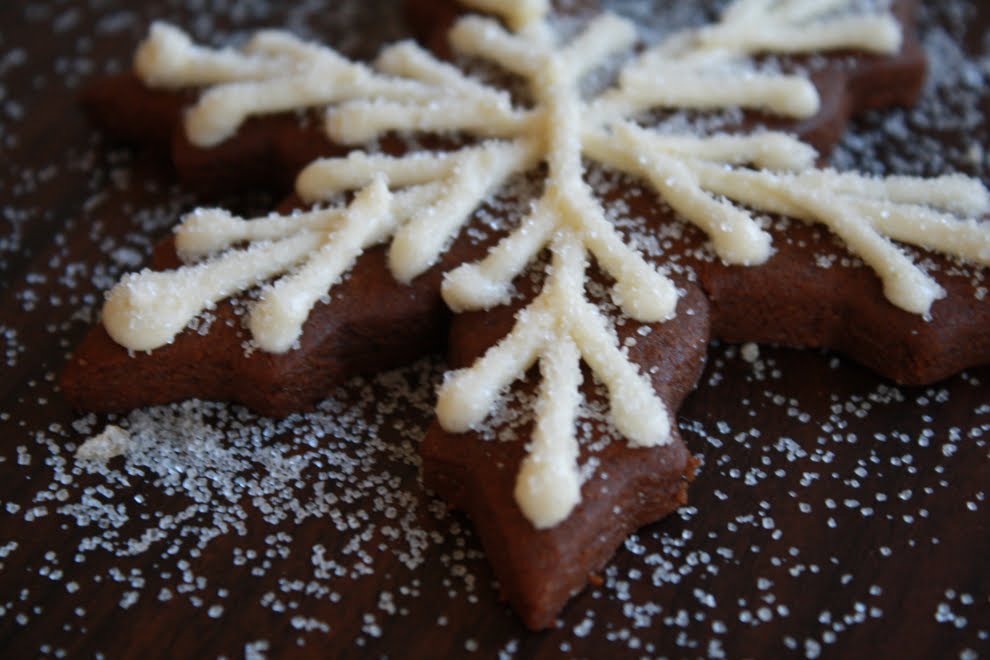
Well, Thanksgiving is over, which means it is officially not too early to start baking Christmas cookies. I'm not of the get-the-tree-up-the-day-after persuasion, I haven't even bought presents in years, but I do love to make cookies and candies and all sorts of pretty confections in the weeks leading up to Christmas. These gingerbread snowflakes were the first of the season--the first cookies and, strangely for Vermont, the first snowflakes.
I've been making this recipe for a few years--since mom and I couldn't resist Martha Stewart's Holiday Cookies special edition in 2006. I often find that Christmas cookies are prettier than they are edible. Not so with these. They're spicy--I particularly like the use of black pepper--and snappy and sweet, though not overly, and take very well to being dunked in a cup of tea.
Martha uses a royal icing for her snowflakes, but I don't really like to eat royal icing so chose this year to use a simple buttercream instead. The advantage of using royal icing is that it hardens well and the cookies are then stackable. The advantage of buttercream is that it tastes good and melts on your tongue in the way that butter will and offers an altogether superior eating experience. If I were to make these cookies purely for visual effect--to use to decorate a tree or window, for example--I would poke a hole in one of the spokes before baking the cookies and go with the royal icing.

Gingerbread Cut-Out Cookies

adapted from Martha Stewart

  • 3 cups flour
  • 1/2 tsp. baking soda
  • 1/4 tsp. baking powder
  • 1/2 cup butter
  • 1/2 cup dark-brown sugar, packed
  • 2 tsp. ground ginger
  • 2 tsp. ground cinnamon
  • 3/4 tsp. ground cloves
  • 1/2 tsp. finely ground black pepper
  • 3/4 tsp. salt
  • 1 large egg
  • 1/2 cup unsulfured molasses
  • blank
  • 2 1/4 cups confectioners sugar
  • 1/2 cup plus 2 Tbs. butter, room temp.
  • 1 Tbs. milk
  • 1/2 tsp. vanilla
  • sanding sugar
  • Combine flour, baking soda, and baking powder in a bowl and set aside.
  • Either by hand or in a stand mixer fitted with the paddle attachment, cream butter and sugar until fluffy. Beat in the spices and salt and then add the egg and molasses on a slightly lower speed. Add the flour mixture and mix until just combined. It might look like it will never combine, but don't despond, it will. Divide the dough in half (to make it more manageable when you roll it out), form into two balls, wrap well in plastic, and refrigerate for about an hour, or until cold.
  • Line baking sheets with parchment. Preheat oven to 350°F.
  • Roll out dough on a lightly floured surface to 1/4-inch thick. Cut out as many shapes as you can and place them on the baking sheets. Feel free to gather the scraps, re-roll the dough, and cut out more cookies. Refrigerate cookies until firm, about 15 minutes, before baking.
  • Bake 12-14 minutes, or until cookies are firm but not darkening around the edges. Cool on wire racks.
  • To make buttercream: Combine sugar, butter, milk, and vanilla using a stand mixer fitted with the paddle attachment. Beat until smooth and pale, scraping the bowl as necessary.
  • Pipe icing onto cookies in attractive patterns and sprinkle immediately with dusting sugar. Allow icing to harden, then tap off any excess sugar.
There is no reason to limit yourself to making snowflakes. What is Christmas without a few gingerbread men? The only other cutter I had readily available the day I made these was a maple leaf and I think they look just lovely. So, let the cookie making commence!