Saturday, December 20, 2008

Slaughter, Part One

The pigs were, of course, raised for food. And to eat pig one has to go through the messy business of killing it. So it was that the next time I saw the pigs, about 4 weeks after I met them, was the day they died.
I didn't sleep very much or very well the night before the slaughter. When I woke up to falling snow I thought (hoped?) that Neil might call and say it was off. He didn't. He called, instead, to ask me to pick up coffee for him and Pete on my way out. Large. Coffee. And whiskey, he joked. They were a bit nervous about the whole thing too.
I parked at Neil's house and walked over to the farm. The pigs, thinking there might be something in the Dunkin' Donuts cups for them, crowded to the edge of the yard, careless of the electric fence. To get to the barn, where I thought Neil and Pete might have been making final preparations, I had to cross the yard. The pigs made this crossing next to impossible. I put one rubber booted foot into the yard followed by the other trying to avoid the electric fence and keep my balance at the same time, which wasn't easy with three pigs attaching themselves to my legs. It was a difficult crossing for another reason too. Not only was I trying to keep upright, avoid the electric fences, and keep from spilling the coffee, I also found myself trying to avoid making eye contact with the pigs.
Physical and psychological hurdles finally managed, I got to the barn only to find it empty. I tried the other barn. Neil and Pete weren't there either. I could only think, then, that they were in the house. And they were. I found them in the kitchen going over the game plan. They jumped on the coffee, thanked me, and asked me how I was. "Kind of nervous, actually," I said. They told me they were too, actually.
Pete showed me the order of events. He had written it down in Sharpie on a large piece of discarded cardboard. Shoot, stick, scrape, hang, cut off the head, score the belly, rip the belly, loosen and tie the bung, gut, score the back, cut the spine. We took a look at the equipment: knives, a spool of yellow twine, and a gun. Neil and I were both taken aback by the gun. We knew the pigs had to be shot, but to actually be in the same room as a loaded pistol was something strange to both of us. "Is it loaded?" Neil asked. "Well, yeah," Pete said. "Does it have a safety?" Neil asked. "No, I don't think so," Pete said. Oh. He then went onto the porch to smoke one of several--and, I'm sure, much needed--cigarettes. "I'll quit tomorrow," he kept saying, "but today I need these."
It seemed we all found ways to delay the killing of the pigs. Pete had another cigarette, Neil decided to change his trousers, I went to the toilet. Maybe Pete did need another smoke. Maybe Neil's trousers were too warm. Maybe I did have to pee. Maybe none of us wanted to see the pigs shot.
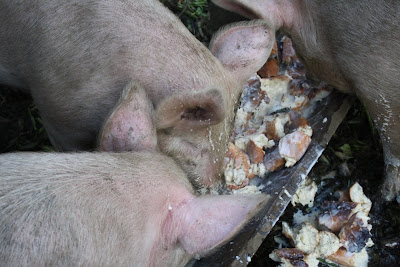
Eventually we made our way down to the yard. It was when Neil and I were emptying 10 Guinness into a bucket to give to the pigs that I learned they had not eaten since the previous morning. No wonder they had showed such an interest in me and my coffee cups. Neil had seen it done before--feeding Guinness to pigs before slaughter. It calmed them down, he explained, and made things go a little more smoothly. The pigs were worked up, so, if it worked, why not? Pete had seen it done before too. "Yeah, it calmed one of 'em down," he said, "The other one just wanted to fight." I guess pigs can be mean drunks too. We gave them the Guinness in spite of Pete's cautionary tale and after a while it started to take effect. It was noticeable in the smallest one first, but by and by they all quietened down and became unsteady on their trotters. They mostly forgot they were hungry, but to distract them from the whole shooting-your-sibling-in-the-head thing we put some soy milk in the trough, which they went to readily. As they stood there slopping up the milk, Pete walked up to one the pigs, pressed the pistol to its forehead, and squeezed the trigger.

Friday, December 19, 2008

Meeting the Pigs

It was a crisp November afternoon when I met the pigs. Neil told me to come late afternoon, but before it started getting dark--around dinner time. Apparently pigs aren't altogether that exciting unless they're hungry. I arrived at 3, we had a nice cup of tea, then donned our rubber boots and went across the road to feed the pigs.
There were three hungry pigs, two girls and boy, waiting for us when we got there. They were so eager to be fed that they made it difficult for us to walk across the yard to where their food was kept. (I had heard of the strength of a pig's snout, but never before witnessed it first hand.) Feeding pigs takes more planning than I could have imagined. What pigs live for is grain. So, naturally, you cannot feed them the grain first or they won't eat anything else. First we gave them their veg. They were hungry enough to show some interest in it, but they won't really go for the veg if they think something better is coming. They were far more interested in the stale baguette being broken apart (by me) and soaked in expired soy milk. Nothing, though, compared with the gusto with which they took to the pellets of grain. With a can full of grain in his hand Neil was their A-number-one favorite person on the planet. They were snorting and carrying on and standing in the trough and pushing each other out of the way, even though there was plenty for everyone. These were happy pigs. Happy as pigs in... grain.
This is the story of the pigs as told to me by Pete, Neil and Jen's neighbor and the man on whose farm the pigs lived. Jen had a dream. Jen had a vision. Jen just saw pigs in the farm yard across the street. But there weren't any so she told Pete. Pete was dubious. He had had experience in keeping animals with other people. He had seen such enthusiasm before, but had also seen the shirking of chores, the distinct lack of enthusiasm when it came to actually caring for the animals once they arrived. He knew the difference between the dream of keeping animals and the reality. He said, "No." But the seed had been planted and soon enough P. started seeing pigs in his yard too. One afternoon he went across the street and told J. and N. that he was about to make their dreams come true. They had no idea what he was talking about. But soon enough it was clear that he meant that he was willing to let them keep pigs on his land as long as they fed them, watered them, cleaned up after them, cared for them. And they did. Dumpster diving for veg behind the co-op, rounding up stale bread and out of date milk/soy milk/kefir/whatever became regular activities for N. He did such a good job caring for the pigs and the pigs did such a good job turning over last year's garden that P. is not only going to share the garden with N. and J., he is already talking about next year's pigs.

Thursday, December 11, 2008

Moving

Sorry for the distinct lack of new posts. I've been moving house and have had neither a spare moment nor an internet connection. Hopefully the cooking and posting will resume in the not too distant future. 

Monday, December 1, 2008

Mince pies

Now is the time of giving. Of giving people baked goods they may or may not actually want. But who can refuse a mince pie? Especially one made from scratch right down to the butter in the crust and the candied citrus peel in the mincemeat.
Two weeks ago I did a trial run. I made a 10-inch pie crust not knowing how many pies I would get out of it or how much filling it would take. I cut the bottoms out with a 4 inch round cookie cutter, the tops with a 2-3/4 inch cookie cutter and the vent holes with a petal tip. I ended up with six pies, although I probably could have squeezed out a couple more, and it took just under half a pint of mincemeat.
It is rather a tedious process, putting together mince pies, so it really makes more sense to do a lot of them at once. I have an entire quart of mincemeat in the fridge so if six pies used less than half a pint I have at least 24 pies still to make, which means 4 10-inch pie crusts. And if Jane eats twice as many mince pies as Sally...
But then you get them in the muffin tins and they're so very cute and worth all their tediousness. And then you get to wrap them in waxed paper and give them to people, which is really the most satisfying part of all.

Sunday, November 23, 2008

A Note on Pie Crust

I have an ongoing list in my head that includes the subjunctive, organic chemistry, and pie crust. These are but a few of the not-really-that-hard things that people have decided are difficult. Maybe O-Chem really is hard, but I can promise you pie crust isn't.

Pie Crust

8 or 9-inch two crust pie

  • 2 cups flour
  • 1 tsp. salt
  • 2/3 cup plus 2 Tbs. butter, cold
  • 4-5 Tbs. water, very cold
  • Combine flour and salt.
  • Cut butter into pieces and drop into flour mixture. Using a pastry cutter or your fingers, work the butter into flour until butter is well incorporated, but there are still visible pieces of butter. (Recipes often say, 'until mixture resembles small peas,' but I like to leave slightly larger pieces.)
  • Using a fork, stir in water one tablespoon at a time, being careful not to add too much. When dough begins to form into clumps, enough water has been added.
  • Form the dough into a ball. The dough might be somewhat crumbly, but as long as you can make it into a ball it will be alright. Wrap in plastic and refrigerate at least half an hour before rolling.
I have heard people talk about 'the trick' to pie crust. There isn't one. There are, however, a few crucial details. The butter and water should be cold. Before adding any water, the butter should be well cut into the flour. You should not, under any circumstances, add too much water. I was talking to my mom while writing the instructions and she said that the maximum amount of water (5 Tbs in this recipe) has never in her experience been too little, but it has at times been too much. Once you have some experience making crust, you'll know what to look for. Refrigeration makes your dough more manageable. It makes it stick together and enables you to roll a thinner crust. Refrigeration can save a very short dough--one that could have used a touch more water--but nothing can save a wet one. One last note: be careful not to over-handle the dough. Mom says it takes a light touch--a manhandled dough makes for a tough crust.
Okay, so I can see why some people might have a complex about making pie crust. But really, once you know what a good crust feels like, you'll wonder why anyone ever buys a pre-made-freezer-burned-good-for-nothing crust. At this time of year I pass countless numbers of just such crusts over my scanner and it takes an act of will not to slip this recipe into people's shopping bags. Maybe this year I will.

Friday, November 21, 2008

Pot Luck

Or should I say pan luck? This pan has been kicking around the house for ages--I think I gave it to my dad for Christmas one year--and I always thought it was kind of silly, not particularly useful. Yesterday I proved myself wrong. It has a very particular use. If you want to make crepes, you want this pan. It is truly amazing. No sticking, no burning, no panicking--just one perfect crepe after the other.
Of course, a good recipe helps too. Last week I bought myself a present of Mastering the Art of French Cooking, Volume One by Julia Child, Louisette Bertholle & Simone Beck. Their crepe recipe is dead easy and equally tasty. You just put a cup each of cold water and cold milk in a blender followed by 4 eggs, 1/2 tsp. salt and 1-1/2 cups flour. Pour in 4 Tbs. melted butter and blend on high for a minute. Scrape the sides with a rubber spatch and blend for a few more seconds. Cover and refrigerate the batter for at least two hours. And there you go, batter in 90 seconds or less. After you make your first crepe you can see if you have to adjust your batter--usually thin in out a bit. I beat in two additional soup spoons of water. Julia says that the 'batter should be a very light cream, just thick enough to coat a wooden spoon.'
I didn't have a recipe for the filling, but I had an idea of what I wanted. I took about 8 oz. each of mascarpone and ricotta and blended them together in my Cuisinart. I sliced up 6 oz. of smoked salmon trimmings and finely chopped a couple Tbs. of the parsley I had left over from making soup the night before. (I rinsed the chopped parsley so it wouldn't turn the filling green.) I ended up using about 3/4 of the cheese mixture and adding to that the salmon, parsley, a pinch of salt, and a grind or two of pepper.
I made a sweet filling with the left over cheese. I bought a 15 oz. tub of ricotta and used just over half of it originally so I added the rest of it to the mix along with probably 1/2 tsp. salt and 2 Tbs. honey.
I filled 10 crepes with the salmon filling, 8 with the honey, and had 1 left over. Yes, they were good. With the help of Julia, a good pan, and a little smoked salmon what could possibly go wrong?

Wednesday, November 19, 2008

Mincemeat

It's been a busy morning. Just 10 o'clock and I've put crepe batter in the fridge for tonight's potluck (I'm taking smoked salmon-ricotta-mascarpone crepes), put a batch of yoghurt in the incubator, and clarified butter in which to cook my crepes. But this is a post about mincemeat.
You've already heard more than you'd probably care to about candied peel and I've most likely spent too much time and energy on procuring/producing a minor ingredient, but I did use it. And it was very satisfying. The other ingredient I had rather a hard time finding was suet. I've been driving past a farm advertising grass fed beef for months now and have been curious to buy some meat from them. I also thought they might sell me some grass fed suet. The sign says, 'Tues.-Thurs. 4-6 Sat. 10-12,' so I went out on a Wednesday at 5 only to find the gate closed and no sign of grass-fed-beef-selling activity. A little disappointed, I returned to town. I thought the meat department at the co-op would be of some help, might even have some suet, but I was wrong on both counts. I went up to the meat window and told the man on the other side that I was looking for suet and wondered if he might have some. 'Don't have any--can't help ya,' he said almost before I had finished my sentence. Tapping reserves of courage I asked a second question. Did he happen to know anyone who did have any? 'Nope--can't help ya,' he said, trodding on several of my words. Oki-doke. I guess I wasn't getting the suet there. Instead of driving from pillar to post--the other two supermarkets here are on opposite sides of town--I came home, vented my frustration with the rude and entirely unhelpful (if perfectly honest) meat man, and made a phone call. The first supermarket I called had suet. 'Yup,' said the said the meat man, 'we've got it. Fresh beef suet.' I asked him if it was the real deal--you can't be too careful with suet, they'll try to sell you anything--and he assured me that yes, it was. I'm still not sure whether it was or not, but I was just happy to have found suet and not to be snarled at but a meat department employee. The remainder of the ingredients--raisins, golden raisins, currants, apple, almonds, lemon juice, orange zest, lemon zest, brown sugar, brandy, nutmeg, cloves, cinnamon, and ginger--were easy to come by. The bulk department stopped carrying mace and I wasn't about to buy an entire jar for only a pinch. I left it out with little regret and no damage to the mincemeat.
The November 2008 issue of Saveur has a nice article on mince pies and two recipes for mincemeat. One is the traditional mincemeat containing meat as well as suet; the other is the modern version without meat. I mostly followed the modern mincemeat recipe and also consulted The Farmhouse Cookery. I found it strange, though, that they made large pies with mincemeat. I've only ever seen small mince pies, about 3 inches in diameter, and those are what I intend to make.

Mincemeat

makes 1 quart (and a bit)
  • 2/3 cup raisins
  • 2/3 cup golden raisins
  • 2/3 cup currants
  • 1 apple, cored and finely chopped
  • 1/2 cup almonds, blanched and finely chopped
  • 1/2 cup mixed candied peel, finely chopped
  • 10 dried Conadria figs, chopped
  • 1/4 cup beef suet, finely chopped
  • 2/3 cup dark brown sugar, packed
  • 1 tsp orange zest
  • zest and juice of 1 lemon
  • 1/4 tsp grated nutmeg
  • 1/8 tsp ground cloves
  • 1/8 tsp ground cinnamon
  • a pinch each of mace and ginger
  • 4 Tbs brandy, whiskey, or rum
  • Roughly chop the raisins, golden raisins, and currants and mix together. Add the rest of the chopped (and finely chopped) ingredients, sugar, spices, and liquids and mix together. Put in jars and store in the fridge. It is best to let it sit for a few days before using
I have a thing for dried figs so I chopped up ten Conadria figs and added them to the mix. The recipe in Saveur calls for a Granny Smith apple. I thought that was a bit boring and I live a few miles from an heirloom apple farm so I used a Calville Blanc D'hiver. Saveur calls for 3 Tbs. cognac and 1-1/2 Tbs. dark rum. The Farmhouse Cookery gives you a choice of 4 Tbs. brandy, whisky or rum. Use what you have or buy what you like.
Don't be lazy with your chopping. Where it says 'finely chopped,' make an effort to chop finely. Your mincemeat will be better for it. Saveur doesn't specify chopping the raisins or currants, but The Farmhouse does. It seemed to me that the juices might flow more and flavors mingle better if all the ingredients were chopped. In The Farmhouse there is a picture of all the dried fruit and apple and everything being passed through a foodmill.
So once everything is chopped and mixed together add the liquids and spices and zest and sugar. Mix again well and put in jars. Saveur says to refrigerate for 2 days to 2 weeks.The Farmhouse is a little different. It says to 'cover the bowl with a tea towel and leave for 2-3 days. Stir the mixture well two or three times a day. Then add the spirit. Pot and seal as jam.' I followed the procedure from Saveur.
I've already done a trial run of mince pies and they were spectacular. More on that later.

Tuesday, November 18, 2008

Candied Citrus Peel Redux

Every time I walked into the kitchen after having candied citrus peel I saw the Ball jar of peel on the counter and remembered my resolve to make it work. Unfortunately, I couldn't get rid of the niggling feeling in my gut that it wasn't quite what I needed for my mincemeat.
And then at work last week I saw the cover of Martha Stewart Living and her perfectly candied wedges of peel and I became determined to retry this whole candying peel thing and succeed. I didn't want her entire magazine so I just read the directions a few times until I was confident I could duplicate them at home.
The biggest difference, I think, lay in the slicing. Instead of using my channel knife and making peel ribbons, I took Martha's advice and scored the peel as if to quarter the fruit and then peeled it. I then cut the quarters into smaller pieces, trying to maintain a pleasing wedge shape and mostly succeeding.
The rest of the process was basically the same as described in The Joy of Cooking. I boiled the peel three times to get rid of the bitterness and then boiled it in syrup. I felt quite chuffed with myself for thinking of wiping down the sides of the pan with a pastry brush dipped in water during my first attempt because although this was not instructed in The Joy, Martha did recommend it. For the syrup Martha suggested 4 cups of sugar to 4 cups of water to candy the peel of several fruit. Unlike in The Joy, all of the syrup does not get absorbed. The indication of doneness is the transparency of the peel, which is achieved after about an hour of simmering.
If you're using the peel in baking, as I was, Martha suggests storing it in some of the syrup.
If it is to be offered as a candy, put the peel on racks and sprinkle with sugar.
I was pleased with the results of the candied peel redux. I was satisfied that this batch would work nicely for my mincemeat. The peel before me coincided with the image of candied peel I had in my head and my niggling doubts were put to rest.

Sunday, November 16, 2008

Buttery Thumbprints with Citrus Curd

Candying lemon and orange peel led to lemon-orange curd and making curd necessitated the baking of cookies on which to put said curd. So, of course, I obliged.
I work in a food co-op in the part of the store where the magazines are displayed. It being a food co-op, nine tenths of the magazines are food related (the other tenth is split between yoga and politics) and a constant temptation. Now that the holidays are upon us, nine tenths of the nine tenths of the magazines are devoted to cookies. It was more than I could bear. Luckily for me, at the moment I was giving way to temptation, about to buy The Best of Fine Cooking: Cookies, my mom came in and bought it for me.
I adapted their recipe for Orange Cream Stars, a sandwich cookie composed of a delicious sounding, although as yet untried, orange butter cream sandwiched between two buttery star-shaped cookies. I didn't use the orange cream because the whole point of the endeavor was to use my citrus curd. As I said in my post on curd, I felt as though the curd could have gone a little longer, been a little thicker, so and I didn't think it would stand up to being sandwiched. I thought instead, thumbprints! So instead of Orange Cream Stars I made Lemon Cream Cheese Thumbprints with Citrus Curd.
For the cookies:
3 oz. cream cheese, softened
1/2 lb. unsalted butter, softened
1 cup granulated sugar
1 Tbs. freshly grated orange zest (I used lemon zest)
1 large egg yolk
1 tsp. pure vanilla extract
12oz. all-purpose flour (My co-op has organic unbleached white flour with germ, which acts like 'regular' white flour but lends a pleasant nutty flavor to whatever you bake with it.)
Beat the cream cheese, butter, sugar, zest, yolk, and vanilla until fluffy, then add the flour gradually. I would recommend using a stand mixer.
To make stars pipe the dough onto a cookie sheet lined with parchment using a 1/2-inch star tip. To make the thumbprints I mashed down the stars' tips with a buttered 1/2-tsp. measure. They don't spread much, so you can put them quite close together.
Bake the cookies in a 350-degree oven until the edges begin to brown, about 20 minutes.
Set the cookie sheet on a rack until the cookies are cool enough to remove with a spatula without distorting their shape.
Once the cookies were cool I filled their dimples with curd. At first the curd seem too runny. I bit into a cookie and the curd started running down the side and down my front and onto the floor. After a few hours, though, the curd set up quite nicely and hopefully didn't cause my coworkers, the lucky recipients, any embarrassment.

Friday, November 14, 2008

Lemon-Orange Curd

Having candied the peel of two lemons and two oranges, I was left with four naked citrus fruit. They would not last long in that vulnerable state so I had to do something with them. Forget lemonade. When the world gives you naked citrus, make curd!
For the recipe I turned to one of my favorite cookbooks, The Farmhouse Cookery: Recipes from the Country Kitchen. The great thing about this cookbook is that the recipes call for so little and deliver so much. You can have a pinch of flour, an egg, an apple, some sugar, and, y'know, salt and you'll find a recipe that provides dessert for 4. One of my standbys is the plum sponge, which can be made with almost any fruit--whatever happens to be in season. The recipes also come with a bit of history.
Lemon or Orange Curd
Countrywide
Lemon curd seems to be descended from the curd tarts of the early 17th century that were known as cheesecakes. Their fillings were composed of curds, eggs and spices.
Later in the century, as lemons became more widely available, the lemon cheesecake, filled with a mixture of pounded lemon peel, egg yolks, sugar and butter, came into vogue. Orange cheesecake was also made from the peel of Seville oranges, which was first boiled two or three times to reduce the bitter flavour.
But more than 200 years were to pass before it occurred to anyone that the filling might be delicious if spread on bread and butter.
Preparation Time: 20 minutes
Cooking Time: 30-40 minutes
Ingredients to yield about 1.5-2 lb.
Juice and finely grated peel
of 3 large or 4 medium lemons
(or oranges)
8 oz. butter
1 lb. caster sugar
5 eggs, beaten
Place the juice and finely grated peel in the top of a double saucepan or in a bowl over a saucepan of boiling water. Add the butter and caster sugar and stir gently over a low heat until the sugar is completely dissolved.
Take the pan from the heat and strain in the beaten eggs.
Put back over over a low heat and cook gently until the mixture coats the back of the spoon, stirring occasionally. Pot and seal.
This curd has a shelf life of 2 weeks, but will keep for up to 1 month in the refrigerator.
So that's the recipe I followed. Since I had already removed all the peel and used it for something else, I couldn't use it in the curd, but I don't think the curd suffered that much for lack of it. I was afraid of cooking my eggs because my juice-butter-sugar mixture had gotten quite hot, so before straining the eggs into the juice I put some of the juice in the eggs to let them get used to the temperature. Nobody likes being thrown into a too hot bath. As for the cooking time, I think it took more like an hour for my curd to thicken and I probably could have cooked it a little longer. So if it's been 40 minutes and you're still not there, don't despond just let it go longer. I figure a lower heat and more time and not cooking your eggs is far better than quickly thickened grainy curd. It's always nice to have a jar of curd in the fridge. It is great for instant desserts. You can make tarts, put it on cookies, spread it on toast, or just bread with lots of butter. Or even just eat it by the spoonful.

Thursday, November 13, 2008

Candied Citrus Peel, Part One

I got it in my head to make mince pies this Christmas and, of course, to make the mincemeat from scratch. I had not, however, envisioned candying my own peel.
Last week when I was going to do laundry I didn't have any cash so I thought I would start collecting the ingredients I needed for mincemeat and get some cash back for my washing. Having seen the day before that the holiday baking display was up and the peel had arrived, I decided to start there. I have become a stickler for reading ingredients labels and much to my dismay the second ingredient was the dreaded high fructose corn syrup. People were candying peel long before there was high fructose corn syrup so I saw no reason why I couldn't either. I left the store with two Meyer lemons, a couple Valencia oranges, and enough cash back to wash and dry my clothes.
The Joy of Cooking came through with a recipe. Its first direction is to 'cut into thin strips and place in a heavy pan: 2 cups grapefruit, orange, lime or lemon peel.' It doesn't specify how to cut said thin strips so I got out my channel knife and started cutting away. I ended up with just over a cup of peel so adjusted the rest of the recipe accordingly. To get rid of the bitterness of the peel you have to bring the peel to a boil, simmer, strain, and 'repeat this process 3 to 5 times in all.' I repeated the process 3 times. Once the peel is sufficiently de-bittered you boil it in syrup until the syrup is absorbed and the peel is transparent. The Joy suggests 1/4 cup water to 1/2 cup sugar for each cup of peel.
Although this is not mentioned in The Joy, I wiped down the edges of the pot with a wet pastry brush every-so-often to prevent crystals from forming in my syrup. The next direction is to 'roll it in: powdered sugar and spread on racks to dry.'
When my peel was done--rolled in sugar and spread on racks to dry--it did not resemble the picture I had in my head of candied peel. I tasted a piece and it was chewy, sweet, and citrusy, but I had a niggling doubt that it was not exactly what I needed for my mincemeat. I decided I could make it work and put it away in a Ball jar...

The Foodstuff Formerly Known as Haggis

I have a coworker whose family and neighbors keep a variety of livestock: pigs, sheep, are chickens livestock? Her husband, it turns out, is a regular charcutier. He cures meat; he turns it into sausage. He also makes haggis. Last week at work I peppered poor J. with questions, finally eliciting an invitation to their next sausage making day. She must have told her husband about my interest in things food because the next day he came into work, invited me to meet the pigs, and asked if I had ever had haggis and whether I might like to try his. I told him I hadn't and that yes, I would. Following his instructions I pan fried it until golden on both sides and I had it for lunch yesterday. I can report that it was delicious. The texture was pleasing, the flavor was savory and earthy (I think that word 'umami' might fit here). I think it so unfortunate the reputation some foods have. I have rarely heard the word haggis without an accompanying derogatory word or sound or scrunching of the nose. If what I ate is at all representative of haggis at large, its reputation is completely undeserved. I suggest we rename haggis and watch as people try it and like it.

Tuesday, November 11, 2008

Cultured Butter

Yes, I've been stuck on a milk theme. But why not? There's so much you can do with milk. Besides, where there's milk, there's cream. And where there's cream, there could be butter.
I've been hearing a lot about cultured butter lately. It just keeps coming up--on websites, in conversation (the conversations I have, anyhow), in magazines--so I thought I would see what it was all about. I followed the directions given on The Traveler's Lunchbox, where you can also find a good description of what exactly cultured butter is and why. Basically, it is butter made from cream that has been cultured--introduced with bacteria and allowed to ferment overnight. Basically, it is delicious.
To make butter, one needs cream. I first asked my milk man if I could get cream from him. He sort of hemmed and hawed, so I took that as a no. A few days later I was at a talk where samples of local raw milk were on offer, so I asked one of the sample-givers if she knew of a source of raw cream. She gave me a name, told me her number was in the book, and suggested I give her a call. Her number is in the book and I did give her a call. I explained how I got her name and asked if it was indeed true that I could buy cream from her. "Oh, yeah, sure, help yourself, it's on the bottom shelf in the fridge. The very bottom. The cream for sale is on the bottom shelf," she said. Right. It's in the fridge. On the bottom shelf. But where is the fridge? "Oh, well, you go down --- Rd. a couple miles and y'know where --- used to be, well, that's on the left and what used to be --- that's on the left a little ways down and just past that there's a dirt road on the right. We're down that road. You can see the farm from the road. We're just down that dirt road, yeah, just past the bend." On the dirt road. Just past the bend. I've only lived here for a year, so what used to be such-and-such doesn't really mean much to me, but I didn't like to press her for better directions. By the end of the phone call I knew that there was raw cream on the bottom shelf of a fridge down a dirt road just past a bend for $2.50 per quart. And to please return the jar when I was done. I was just glad to have found a source of cream.
Now I just had to find the fridge. I called the farm on Monday and on Thursday I took her directions and my camera and set out to find it. I found the dirt road and its bend surprisingly easily, considering the cryptic nature of the directions and the fact that both of the landmarks I was looking for didn't exist anymore. The only problem was that I still didn't know exactly where the fridge was. When I drove up I saw a house on the right and a barn and a shed on the left. There were two cars parked outside the house so I thought I would ring the bell and ask. I rang the bell twice, but nobody answered, so it was up to me to find the fridge alone. I still wasn't exactly sure I was in the right place, but thought I would look around anyway and see what I could see. The shed seemed like a promising place to start. As I walked up to it I could see there was a note in the window of the door. It was an apology for the low supply of eggs that week. If they sold eggs, it seemed likely they sold cream and that I was in the right place after all. I tried the door, it opened, and lo, there was The Fridge.
As promised there was one jar of cream on the bottom shelf. I left $2.50 in the lock box in the door of the fridge and took my cream.
It felt as if my adventure was over, having procured the cream, but I still had butter to make. When I got home I put the quart of cream in my yoghurt making jar and added 1/3 of a cup of yoghurt. I set the jar on the counter and left it there overnight. The next morning the cream was definitely thicker. Before whipping it, I had to cool the cream, so I put it in an ice bath in the sink. Then, using my KitchenAid, I started whipping the cream. It was a beautiful thing to watch. I don't think I've seen cream so thick before and it didn't take much to get to stiff peaks. I could tell that it was about to break, so I lowered the speed. I'm a huge fan of gently whipped cream on pie, so it was hard to watch a bowl-full of gorgeous cream break, but to make butter you've gotta break some cream. At this point I had butter clumps swimming in buttermilk. I drained off the buttermilk as best I could and prepared to rinse the butter. It is a strange feeling pouring ice-water into not quite formed butter, but that is what was called for. I poured in the ice-water and kneaded the butter with a wooden spatula. I repeated the rinsing several times until the water ran clean. I kept kneading to get as much water out of the butter as possible and then declared it done.
Homemade cultured butter. It is delicious. It was worth the phone call, the drive, the pain of watching beautiful cream break, the awkwardness of the rinsing. I bought some cultured butter to see how mine held up to that of the professionals and I honestly think mine was a bit better. It could be that I wanted it to taste better; that I wanted my cream caper to be an unequivocal success, but I really do think my butter was richer, somehow, and bit tangier.
I have since convinced my milk man to let me buy cream from him, so hopefully I'll be making and eating my own butter indefinitely. And if push comes to it, I know where the fridge is.

Yoghurt

I've been getting milk from the farm for eight months. I've been making yoghurt from it for about seven and a half. When I started getting raw milk I was still buying yoghurt at the store. It soon dawned on me that I could make my own yoghurt. My thinking was that such delicious milk must be able to be transformed into delicious yoghurt. It turns out I was right, although it took me a little while to get consistently good results.
The first time I tried to make yoghurt I didn't have a thermometer, an incubator, or any experience. I had the thought, though, that it could be done. So it was that I heated a half-gallon of milk until it was warm to the touch, stirred in some store-bought yoghurt with active cultures, poured the mixture into canning jars and left them in the the half-bathroom with an electric heater overnight. The results were not spectacular. I ended up with slightly thick-ish sour milk. Surprisingly, I wasn't discouraged.
The next day I ordered myself a Yogourmet Multi II yoghurt maker. I think "maker" is a bit of an overstatement, though. I prefer to think of it as an incubator. In any case, it is a great little machine that keeps my milk and bacteria at the optimal temperature for turning milk into yoghurt. I also got myself a thermometer.
Seven months later, I have my process down.
First a note about starters. I used to order the Yogourmet starter culture, but find that using half a cup of store-bought yoghurt that has active cultures works just as well. It also allows you to somewhat control the texture of your yoghurt. I find that the finished product mimics the texture of the starter yoghurt. I use Butterworks whole milk yoghurt because it's local to Vermont. It also has a silky texture and a nice tang that translate well into the finished product. I can also recommend Seven Stars whole milk yoghurt, for all you Pennsylvanians. I tried using some of my own yoghurt as a starter, but found that it didn't work very well. The resulting yoghurt was grainier than I like, although the flavor was still good. I'm not sure why, but my thought is that the other bacteria in the raw milk took over, overpowering the 'intentional' bacteria from the store-bought yoghurt.
I start by putting a half-cup of the starter yoghurt into a Pyrex measuring pitcher. Knowing the jar in which I incubate my yoghurt doesn't fit quite a half-gallon of milk, before I heat the milk I decant some of it into this little crystal pitcher that came from my grandmother's house. (It holds the exact amount that doesn't fit in the jar.) I then heat the milk, stirring it constantly, until it reaches 110 degrees Fahrenheit. To keep the bacteria from getting too much of a fright, I ladle some of the hot milk into the starter yoghurt and stir it up, making sure there are no lumps. I then add the mixture to the pot and stir it in. I pour the milk into the jar, pop it into the Yogourmet, which I have filled to the line with warm water, plug her in, and wait at least eight hours. The whole process, including dishes takes less than ten minutes.
On the other end of the eight or so hours (it doesn't really seem to matter how long you leave it, whithin reason), I strain my yoghurt to make it a bit thicker. I put two pieces of cheesecloth in a colander and the colander in a bowl. I pour the warm yoghurt into the colander and let it sit until it reaches the desired thickness. If I want a runnier yoghurt I leave it for between 40 minutes and an hour, if I want it thicker I leave it longer. Reaching the thickness of Greek yoghurt takes quite a while, a couple hours or so. At this point the yoghurt is kind of lumpy so I tend to whisk it until it is smooth. Once smooth, I pour or ladle it into a quart jar and refrigerate it before using it for anything. I don't know how long it keeps because it's always gone within three days.
What I like about making yoghurt is that it takes almost none of your time and the result is amazing. I find my yoghurt to be far tastier than any store-bought yoghurt I've tried. It's just so rewarding to transform good milk into perfect yoghurt. Making yoghurt has become a routine for me--it's no longer a hassle, just a normal part of every-other day.

Saturday, November 8, 2008

Know Your Cows

I am fortunate enough to live in an area of Vermont where there are several farms willing to sell raw milk in easy driving distance of my house. I have been availing myself of one such source for the past eight months or so, and cannot imagine getting my milk anywhere else.
Phil's (organic, pastured) herd is a mix of Jerseys and Holsteins. He knows all his cows by name and this morning, at my request, he introduced me to them. Among them are Nora and Emma, Emily, Courtney, Caddy, and Nelly. There's April who he bought from an old man and who is shy of children and strangers. There's Blacky who is a mix of Jersey and Holstein. There's Saltine whose dad's name was Cracker. There is something so reassuring about knowing the names of the cows whose milk you're drinking.
I go out to the farm at least once a week to get milk. Iload up my M. Feller Son & Daughter bag with my empty bottles and take the six-mile drive into the Vermont countryside. In the milk shed I follow the same routine every time. I find a mug (there are usually several in the sink), fill it with water and set it aside. I take the plastic pitcher off its hook and set out my bottles. Then I take the stopper off the zillion-gallon stainless steel tank and pour myself the creamiest, sweetest milk I have ever tasted. Once my bottles are full I rinse the spout with the water I set aside, re-stopper the tank, and clean and hang up the pitcher. I leave my money in the odd-n-ends box and thank Phil if he's around and the cows if they're in the shed.
I leave the milk shed with a sense of well-being. I know exactly where my milk comes from. The tank room is separated from the milking shed by only a swinging door. My milk travels a matter of yards from cow to bottle. And I can see for myself the condition of the shed, the cows, everything. As far as I can tell the cows are happy, the shed is clean, and the milk is pure.
I started buying milk from the farm for several reasons. I have been redoubling my efforts to 'buy local' and buying straight from the cow seemed about as local as I could get. I had a feeling that its flavor would be beyond compare. I had also been told by my doctor that drinking raw milk is far better for you than drinking pasteurized milk (he told me to avoid ultra-pasteurized milk at all costs).
In writing this post I consulted several books including the Oxford Companion to Food, The Cambridge World History of Food, and Sally Fallon's Nourishing Traditions. All of my reading suggests that milk, at first glance the very picture of innocence, is the source of much controversy. There is the question of pasteurization--is it necessary anymore? is it actually harmful? There is the problem of digestion--a large percentage of adults can't digest milk. There are the good bacteria, but also sometimes the bad. However, it also seems unanimous that, as it is put in The Cambridge World History of Food, "Milk remains a singularly, almost uniquely, nutritious foodstuff, invested with elementally significant cultural and nutritional value."(700)