Sunday, November 29, 2009

Gingerbread Cut-Out Cookies

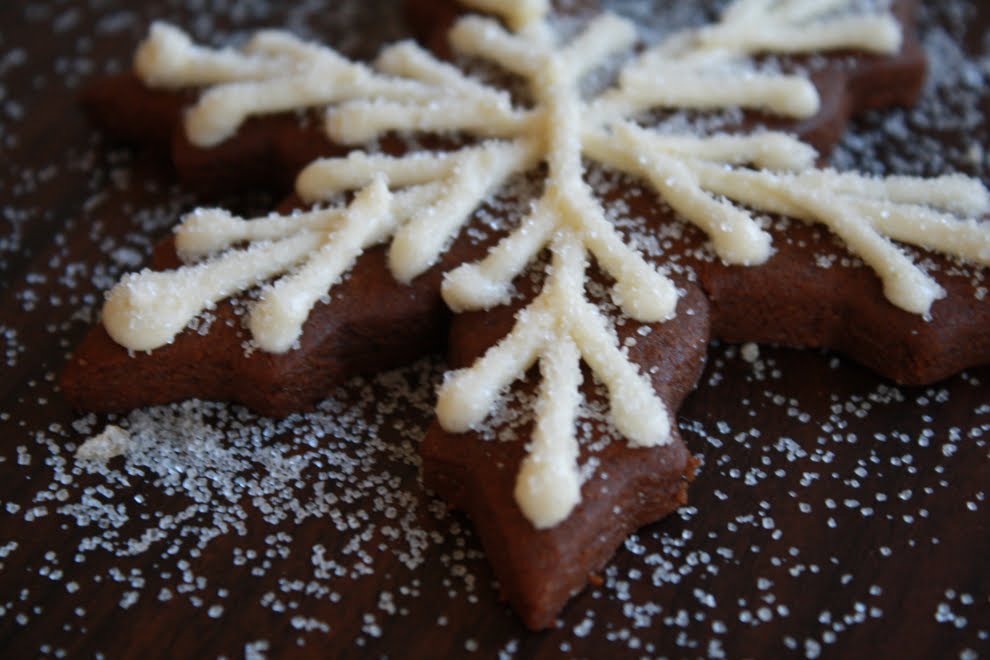
Well, Thanksgiving is over, which means it is officially not too early to start baking Christmas cookies. I'm not of the get-the-tree-up-the-day-after persuasion, I haven't even bought presents in years, but I do love to make cookies and candies and all sorts of pretty confections in the weeks leading up to Christmas. These gingerbread snowflakes were the first of the season--the first cookies and, strangely for Vermont, the first snowflakes.
I've been making this recipe for a few years--since mom and I couldn't resist Martha Stewart's Holiday Cookies special edition in 2006. I often find that Christmas cookies are prettier than they are edible. Not so with these. They're spicy--I particularly like the use of black pepper--and snappy and sweet, though not overly, and take very well to being dunked in a cup of tea.
Martha uses a royal icing for her snowflakes, but I don't really like to eat royal icing so chose this year to use a simple buttercream instead. The advantage of using royal icing is that it hardens well and the cookies are then stackable. The advantage of buttercream is that it tastes good and melts on your tongue in the way that butter will and offers an altogether superior eating experience. If I were to make these cookies purely for visual effect--to use to decorate a tree or window, for example--I would poke a hole in one of the spokes before baking the cookies and go with the royal icing.

Gingerbread Cut-Out Cookies

adapted from Martha Stewart

  • 3 cups flour
  • 1/2 tsp. baking soda
  • 1/4 tsp. baking powder
  • 1/2 cup butter
  • 1/2 cup dark-brown sugar, packed
  • 2 tsp. ground ginger
  • 2 tsp. ground cinnamon
  • 3/4 tsp. ground cloves
  • 1/2 tsp. finely ground black pepper
  • 3/4 tsp. salt
  • 1 large egg
  • 1/2 cup unsulfured molasses
  • blank
  • 2 1/4 cups confectioners sugar
  • 1/2 cup plus 2 Tbs. butter, room temp.
  • 1 Tbs. milk
  • 1/2 tsp. vanilla
  • sanding sugar
  • Combine flour, baking soda, and baking powder in a bowl and set aside.
  • Either by hand or in a stand mixer fitted with the paddle attachment, cream butter and sugar until fluffy. Beat in the spices and salt and then add the egg and molasses on a slightly lower speed. Add the flour mixture and mix until just combined. It might look like it will never combine, but don't despond, it will. Divide the dough in half (to make it more manageable when you roll it out), form into two balls, wrap well in plastic, and refrigerate for about an hour, or until cold.
  • Line baking sheets with parchment. Preheat oven to 350°F.
  • Roll out dough on a lightly floured surface to 1/4-inch thick. Cut out as many shapes as you can and place them on the baking sheets. Feel free to gather the scraps, re-roll the dough, and cut out more cookies. Refrigerate cookies until firm, about 15 minutes, before baking.
  • Bake 12-14 minutes, or until cookies are firm but not darkening around the edges. Cool on wire racks.
  • To make buttercream: Combine sugar, butter, milk, and vanilla using a stand mixer fitted with the paddle attachment. Beat until smooth and pale, scraping the bowl as necessary.
  • Pipe icing onto cookies in attractive patterns and sprinkle immediately with dusting sugar. Allow icing to harden, then tap off any excess sugar.
There is no reason to limit yourself to making snowflakes. What is Christmas without a few gingerbread men? The only other cutter I had readily available the day I made these was a maple leaf and I think they look just lovely. So, let the cookie making commence!

Thursday, November 19, 2009

Humble Pie

Until last Saturday, I thought the expression "humble pie" was purely metaphoric. But, of course, it's not. Y. shot a deer (a 140-pound 4-point buck) on the first morning of the season and that afternoon a short Google search including the terms deer, heart, and liver led me to humble pie. Noone was very specific when it came to recipes; deer heart and liver baked in a crust with apples, currants, and spices was about all I had to go on. It seems that while the lord of the manner was eating the tenderloins (and who can blame him--yum!), the help was given the offal. I cannot claim that the recipe I came up with is authentic. It is, however, very seasonally appropriate, reminiscent of mincemeat, and to my taste buds quite delicious.
This was a new pie making method for me. A few things I learned: use straight-sided jars, or jars with very little taper. The jars I used were angled enough to make the wrapping and tying process more of a bear than it needed to be. Make sure the string is tied tightly enough and that it doesn't slip down. If the string slips too far down, your pie will collapse during baking for not having enough support. This method should not be used for pies without top crusts--the top crust holds everything together and without it the edges would curl down in the oven.
Don't be discouraged, though. I only had one true failure--the rest were beautiful and entirely satisfying. If it does seem like altogether too much bother, just use small pie plates instead.

Humble Pie

makes about 6

  • 1 recipe pie crust
  • blank
  • 1- 1 1/2 cups deer heart and liver, chopped into small pieces
  • 2 apples, peeled, cored, and chopped into small pieces
  • 2 handfuls currants
  • zest of one lemon
  • 1/2 tsp. dried sage
  • 1/2 tsp. salt
  • 1 scant tsp. cinnamon
  • 1/8 tsp. ground clove
  • 1/8 tsp. ground allspice
  • 1/4 tsp. freshly grated nutmeg
  • 2 Tbs. brandy
  • 1-2 Tbs. flour
  • butter for dotting
  • 1 egg plus 1 Tbs. water for glazing
  • Make the filling the day before you plan to make the pies. Briefly sauté the chopped offal in a mixture of butter and oil in a very hot pan. Remove to the bowl you're going to mix the filling in from pan with a slotted spoon. You might see some juices from the meat at the bottom of the bowl, don't drain them. Add the apple, currants, zest, salt, and spices and mix to combine. Stir in the brandy. Cover and refrigerate until the next day.
  • On the day of pie making, remove the filling from the fridge to bring it to room temperature.
  • Make up your pastry dough, form it into two balls, one larger than the other, wrap the two balls tightly with plastic, and refrigerate for at least half an hour.
  • Have ready 6 straight sided jars inverted on a baking sheet. Roll out the larger ball of dough on a floured surface. Using a small plate (about 6 inches in diameter) as a template, cut out circles of dough. You might have to gather the scraps and re-roll the dough to get 6 circles. Drape the circles over the up-side-down jars, pressing the dough to the side of the jar to get a nicely shaped cup. Once all the cups are formed, place the baking sheet in the freezer for 20-30 minutes.
  • Have ready six strips of parchment wide enough to support the pie once it's in the oven and long enough to reach around the circumference of the pie and six lengths of string. Remove the baking sheet of pastry cups from the freezer. Free the pastry from the jars while it is still good and frozen, but put the cups back on the jars so they have some support while you're tying them. Wrap a piece of parchment around the center of each cup and secure it well with string. Take the cups off the jars and place right way up on the baking sheet, which you should now line with parchment. Return cups to freezer briefly.
  • Mix a tablespoon or two of flour into your filling. Have ready a couple tablespoons of butter for dotting on the filling before closing the pies.
  • Take the cups from the freezer and set aside. Preheat oven to 375° F.
  • Roll out the smaller ball of dough on a floured surface and cut out six tops with a 3-inch cookie cutter. Fill the pies, leaving enough room at the top to create a nice edge. Dot each pie with a bit of butter. Place a top on each pie. Seal your pies, using a little water if it seems necessary. Crimp the edges. Poke a hole in the top of each pie (I used the back of a paint brush).
  • Just before they go in the oven brush tops with egg/water mixture. Bake 30-40 minutes, or until crust is golden and filling is bubbling.
Y. said that his friends usually make some godawful stir fry with the hearts and livers of their deer. This being Y.'s deer, he got to choose the menu. I sensed some initial resistance to humble pie, but I think we won them over.

Wednesday, November 11, 2009

Apple Cider

The taste of fresh cider always surprises me. You think you've had good apple juice and then you have a sip of cider straight from the press and you realize you don't know a thing. Now that is apple juice. It's sweet and tart and, being a little bit thick, glides over your tongue in a silky stream of apple essence.
When D. invited me to an apple party, I wasn't quite sure what to expect, but gladly accepted figuring that spending a beautiful fall day outside doing something with apples couldn't be all bad. Having been to parties at D.'s before and having always been unfashionably punctual, I intentionally showed up an hour late, but was still the first to arrive. This meant watching a hungover D. prepare himself a one o'clock breakfast, but also gave me a chance to poke around and take a few pictures.
Shortly after D.'s mom got there we trekked down to the lower pasture to pick apples. They were old, gnarled apple trees bearing small fruit, which were showing a season's wear. They were good apples, though, flavorful and crisp, and the cider press doesn't care about looks.
Each batch of cider tasted slightly different. The one made mostly with the red apples (I'm afraid we didn't know the varieties we were working with) was rich, pleasantly sweet, and quite tart. The yellow apples made a cider too sweet for my taste, with few of the balancing characteristics of the other one. We were especially pleased to see that the cider we pressed from the Hidden Rose apples (sweet, tart, astringent), instead of being golden-brown like most cider, was as pink as--pinker even than the flesh for which the apples are named.
Cider presses are expensive. Apple trees take a long time to grow and mature. Cider is delicious. So when a friend has borrowed a press, has apples to harvest, and asks you to help, just say yes and don't begrudge him his homefries.

Saturday, November 7, 2009

Walnuts

I am of the opinion that perfect fall days--the crisp, clear ones that convince you if hobbits ever came to America they would choose to live in Vermont--should be spent outside. If they can be spent outside in pursuit of a foodstuff, so much the better. Unfortunately, between cooking all morning and working all night, the time I spend outside is often reduced to the seven minutes it takes me to walk to work. It was a pleasure, then, to spend an hour Wednesday morning gathering walnuts in the thicket behind M.'s house.
M. wasn't there, but told Y. he had gathered all the nuts he wanted and to come get the rest before the squirrels did. We followed his directions to the tree, expecting from M.'s description to see nuts littering the ground, but found nothing. At least not right away. I took a few steps toward the stone wall and hiding under some dry, brown leaves were what looked like tennis balls. I immediately heard the voice of HBC saying, "And if Mr. Emerson finds us frivolous, he can go and look for tennis balls. Go and look for tennis balls, Mr. Emerson." After finding the first two walnuts, and confirming with Y. that they actually were what we were looking for, they were suddenly everywhere.
In a little under an hour we gathered four times the nuts that M. thought were still out there. I'm afraid we raided two squirrel caches, possibly dooming two squirrel families, but Y. assured me that squirrels often forget where their hiding places are anyway. If it is any consolation, I promise, in a few weeks when the walnuts have been dried and shelled, to make something delicious with them.

Thursday, November 5, 2009

Quince Brandy

I know I told you it wasn't too early to make up your mincemeat, and it's not. Not if you start giving pies away just after Thanksgiving. But you might want to make more for Christmas and this time you might want to make your mincemeat with quince brandy, which has to sit for at least six weeks, so you'd better hop to.

Quince Brandy

adapted from Nigella Lawson

  • 4-6 quinces
  • 2 litres cheap brandy
  • 4 small cinnamon sticks
  • 4 star anise
  • Rub the fuzz off your quinces with a kitchen towel. Quarter them, without peeling or coring, and place them in a large (one-gallon), wide-mouth jar. Pour the brandy over the fruit, filling the jar. Plop in the spices, close the jar, and leave it for at least six weeks.
I just saw this in Nigella Lawson's How to Be a Domestic Goddess and put it up because I had four quinces languishing in my fridge, so I can't tell you what it tastes like. She says it's "peachily delicious." She says, "The quinces and aromatic spices mellow the brandy, and their fragrances hover around just enough to let you know they're there." I'm inclined to believe her.

Monday, November 2, 2009

Applesauce Quick Bread

I could easily have eaten all three cups of applesauce straight from the baking dish along with the entire pint of crème fraîche, but, fortunately, I didn't. I put it, instead, in jars in the fridge and turned to my cookbooks to decide what to do with it. The Joy of Cooking, that stalwart soul of a cookbook, came through with two recipes, both of which I modified to my particular circumstances. The next morning I baked an applesauce quick bread and an applesauce cake, the quick bread beating out the cake for its place in the spotlight.
This is a moist, substantial, not-too-sweet, and entirely satisfying bread. It uses butter instead of oil, which I like, and the mixture of flours gives it a slight heft without the bread becoming dense. The applesauce, cider, and buttermilk provide ample moisture, the walnuts the right amount of crunch.

Applesauce Quick Bread

adapted from the Joy

  • 1 1/2 cups all-purpose flour
  • 1 1/2 cups white whole wheat flour
  • 1/2 tsp. salt
  • 1 tsp. baking soda
  • 1/4 cup butter
  • 1/2 cup sugar
  • 1 egg
  • zest of one orange
  • 3/4 cup applesauce
  • 1/4 cup apple cider
  • 1 cup buttermilk
  • 1 cup walnut pieces
  • Preheat oven to 350°F. Butter and flour a 9x5-inch loaf pan and set aside.
  • Combine the flours, salt, and baking soda and set aside.
  • In a large bowl, cream the butter and sugar until light and fluffy. Add the egg and beat until well combined. Add the orange zest, applesauce, and apple cider. Mix to combine. Your batter will appear curdled--don't let this bother you. Add the flour mixture and buttermilk alternately, starting and ending with flour. After the last addition of flour mixture, stir until just combined. Fold in the walnuts.
  • Pour batter into prepared loaf pan and bake 1 hour 15 minutes, or until a tester comes out clean. Cool in the pan 10-15 minutes, then turn out onto a cooling rack.
There is not a bad time to eat this bread. It makes a delicious breakfast, a perfect mid-morning snack, a nice something sweet after lunch, just the thing for tea, and satisfies that craving after dinner. Had I not given the second half of the loaf away, I would be eating a slice right now.