Wednesday, May 27, 2009

Chicken Pasties

I roasted a chicken last Tuesday and on Sunday I still had both wings, a leg, and a breast left. It was still perfectly good, of course, but had to be used soon and probably all at once. Sounded like pie to me. Sunday morning after breakfast my family was discussing what to have for our pic-nic the next day and pasties popped to mind. Pasties are wonderful for pic-nics--all the goodness of a pot pie made easily transportable and eaten. Not to mention completely adorable.
I've been using white whole wheat flour a lot lately in conjunction with unbleached all-purpose flour. I like it. It adds a certain something to your baked goods and doesn't feel at all wrong, as substituting whole wheat flour can. I used it in the best biscuits I've ever made, I used it in a cake, and I substituted a cup of it for one cup all-purpose flour in my go-to pie crust recipe for these pasties with excellent results. The pie crust recipe for one 8 to 9-inch two crust pie made 6 decent-sized pasties. You should end up with about 480 grams of dough from this recipe and then you can divide it into six 80g pieces, keeping all but the one you're working on in the fridge.
For the filling I used what I had of leftover chicken--the afore mentioned wings, leg, and breast--plus one thigh. I roasted three thighs, but only ended up using one of them. I didn't really need any of them, but the pasties were nice and chicken-y, so you can use as much or as little chicken as you have/want. Add the peas right at the last so they don't get too mushy. I made the filling the night before assembling the pasties, mostly because I didn't think I'd have enough time the day of, but it worked out well. The next morning I added the still frozen peas and a handful of minced parsley to the cold filling. Working with cold filling meant that the dough didn't start to melt as I was working with it, which makes everything easier, but also helps to ensure a flaky crust.

Chicken Pasties

makes enough filling for 6-8 pasties

  • 1 recipe pie crust
  • what you have of leftover chicken, cut into pieces
  • 1 medium onion
  • 2 cloves garlic, minced
  • 1 carrot
  • 2 small potatoes (Yukon Golds are nice)
  • 1 turnip
  • one small package peas
  • any other veg that appeal
  • a generous pinch each of dried thyme, oregano, sage, and crushed rosemary (or any other mix of herbs that you like)
  • 1 handful parsley, minced
  • 2 Tbs. butter
  • 2 Tbs. flour
  • 1 cup stock or water, hot
  • 1 egg plus 1 Tbs. milk or cream, beaten to brush on top
  • Cut leftover chicken into nice bite-sized pieces. Chop veg to a 1/4-inch dice. I like all the veg to be about the same size as the peas.
  • Put a couple tablespoons of olive oil in aheavy bottomed pan over medium heat. Sauté the onion until soft and transparent, about 10 minutes. Add the rest of the vegetables, except for the peas, and sauté until the potatoes begin to soften. Add the chicken to the pan. Plop in the butter and once it has melted sprinkle the flour over the lot. Stir the pot until the flour is combined. Slowly pour in the hot stock, stirring as you pour. Stir the filling to make sure there are no lumps. Add your herb mix and allow to burgle a little while, adjust the seasoning, then pull it off the heat. Let the filling cool, then add the peas and parsley.
  • The filling should be cold before you assemble pasties. To make a pasty measure out 80g pie dough and roll it out into a circle (roughly). Put a generous scoop of filling on one side. Wet the rim of the bottom half of dough with water. Pick up the top of the circle and, pulling it up and over the filling, match it up with the opposite edge of the circle. Crimp the dough together, making it as attractive as possible. Place the pasty on a parchment lined baking sheet and go on to the next one.
  • Once all your pasties are on the baking sheet, beat together the egg and milk or cream to make a wash. Brush pasties with egg wash and then cut one or more slits to allow steam to escape with out rupturing your pasties.
  • Bake in a 350°F oven until pasties are burgling and golden, 40-50 minutes. Cool pasties on racks before wrapping them up for your pic-nic.

Tuesday, May 19, 2009

Pesto (and an Accidental Feast)

I don't know how other people make pesto. There are probably recipes and ratios and methods I should know about. But I don't. There are probably entire villages of Italian grandmothers feeling shivers up their collective spine as I reach for my Little Pro Plus (TM). But I don't care. I just make it so it tastes good. And besides, how far wrong can you go?
This is what I do: I ask someone in produce for half a bunch of basil. (For some reason they don't keep it on the floor so you have to ask for it.) Sometimes I get half a bunch; sometimes I get a whole bunch with a 'reduced' sticker on it, like I did today. (Thank you.) I take it home and wash it, because I didn't once and ate gritty pesto for a week. I pick the leaves from the stems and put them in my food processor and then go about collecting the other ingredients. You'll need garlic. Today I used 4 cloves, because it seemed right. I started with three, tasted the result, then added one more. Nuts of some description are required, though pine nuts are not necessary. I used a handful of crispy walnuts, though not as many as I might have--I'm running low and wanted some to put in my oats tomorrow. (The pesto was none the worse for it and breakfast will be better.) And cheese. You'll want some parmesan. I still had some 'Ferrari of the Parmesans' in the fridge so I grated a good handful of that and tossed it in the processor. Bit of salt, bit of pepper, and you're ready to go. I turn on the processor and drizzle the olive oil into it in a steady stream until the pesto looks happy. I really have no idea how much I used tonight. Use your judgement. If it looks too dry to you, it probably is. Add more oil. Give your pesto a taste and adjust it accordingly, knowing the flavors will marry and mature as it sits. More garlic? Pinch more salt? Just right? Then bottle it up, remembering to drizzle a layer of olive oil on top so it doesn't discolor. I always feel better knowing there's a jar of pesto in the fridge.
I roasted a chicken this afternoon before making pesto. I like to have some roast chicken in the fridge. It makes taking dinner to work that much easier and the possibilities with leftover chicken are endless. But, anyway, I roasted a chicken. I usually eat one of the more distinguishable parts on the first night, saving the scraps from the carcass for pasties or a pie or a salad, but tonight I did it differently. As I was carving my chicken and putting it in a dish for the fridge I thought, 'Why not save all the best bits for later, put an entire chicken worth of parts in the fridge, and have the scraps tonight.' So that's what I did. I boiled 2 ounces of this delicious pasta made with Jerusalem artichoke flour, sautéed 4 spears of asparagus with a quarter of a red bell pepper ('cause that's what I had left of one), tossed in the oysters of the chicken along with other assorted scraps from the carcass, added a very heaping soup spoon of fresh pesto to the pan followed by the noodles and some of their cooking water and ate like a king. Oh, and I had roasted the chicken on top of an onion cut into rings so I chopped up a couple of those and added them to the pot. Divine. I think (hope) MFK would approve.

Sunday, May 17, 2009

Honey Jasmine Ice Cream

I was given David Tanis's beautiful book, A Platter of Figs and Other Recipes, for my birthday. In it is a recipe for lavender honey ice cream. He uses both lavender blossoms and lavender honey to flavor his ice cream. I took his recipe and combined it with my current obsession with all things jasmine to make mine. I put honey first because it ended up being the dominant flavor, although the jasmine did come through too. I think. Next time I would use a milder honey or less of it orboth. The honey also changes how the ice cream freezes. It came out of the maker still very, very soft and I was worried that it would crystallize badly in the freezer, but it didn't. It came out creamy and smooth and luscious and sweet--just as ice cream should.

Honey Jasmine Ice Cream

makes about 1 quart

  • 2 cups whole milk
  • 1 Tbs. jasmine blossoms, dried
  • 1 cup heavy cream
  • 1 cup mild honey
  • 6 large egg yolks
  • 1/2 tsp. salt
  • Warm the milk to just under a boil over medium heat. Turn off the heat and add the jasmine. Allow to steep at least 15 minutes, until the milk takes on a faint jasmine flavor.
  • Strain the milk and return it to the pan. Add the cream and honey and warm gently.
  • Beat the egg yolks with the salt. Gradually whisk in 1 cup of the warm milk mixture to temper the yolks, then add the contents of the bowl to the pan. Cook gently for 5 minutes or so, stirring diligently, until the mixture thickens slightly.
  • Strain this thin custard into a large bowl and allow to cool. Chill in the refrigerator.
  • Freeze the custard in an ice cream maker. Transfer to the freezer for a little while before serving. You want it a bit firmer than it comes out of the maker, but not frozen solid. If you're not serving it right away, store in the freezer and bring it out to temper before serving.

Thursday, May 14, 2009

Croissants

I hesitated before posting this. I think I can do better. But for a second attempt and a dubious apartment oven, these croissants were as scrumptious and flaky as I could have hoped. They certainly got me dreaming about try number three. I made eight croissants and a couple pains au chocolat, although they were more pain than chocolat and next time I'll make twice as many from the same amount of dough.

Croissants

Andrew Whitley (mostly)

  • 5 g active dry yeast
  • 385 g milk, cold
  • 600 gstrong white flour
  • 5 g sea salt
  • 250 g butter, slightly salted or unsalted
  • 1 egg, beaten for brushing
  • I (Emily not Andrew) prepare my butter the night before so I don't have to mess with it the day of. Place your butter in the middle of a plastic bag or between two sheets of plastic wrap and carefully mash it down with a rolling pin until it becomes rollable. Roll the butter out into a sheet, making it as rectangular as possible, using the edges of the bag to your advantage. Make sure your butter is well wrapped and place in the fridge. Sleep well.
  • Dissolve the yeast in the cold milk. Make up a fairly stiff, stretchy dough with the flour, salt, and yeast mixture. The texture of the dough must not be too soft or the butter will break through it during the folding and rolling process. Once the dough is developed to the right extent (knead for 10 minutes or so), put it in a plastic bag and into the refrigerator for a minimum of half an hour.
  • Dust the worktop with flour and roll the dough into a rectangle twice as long as it is wide and about 8mm thick. Place your sheet of butter over 2/3 of the rolled out dough. If it is not quite the right shape, break or cut off the edges and place the butter where it needs to be. Fold the uncovered third of the dough over half the buttered part and the remaining buttered part back over the resulting sandwich. This will for a 'billet', or parcel, with alternating layers of dough-butter-dough-butter-dough. It is usual to keep a count of the number of fat layers: at this stage you have two. Make sure that the edges are neatly aligned. Pinch the rims of the dough together to stop the butter slipping around when you roll the billet out.
  • Roll the dough out in the opposite direction to the first roll. You should aim to produce another rectangle about twice as long as it is wide. This time, instead of folding the dough in three, do a 'book turn'. Pick up the short edges of the dough and fold them inwards until they meet in the middle. Then fold the two 'pages' together as if you were closing a book. You have now got eight fat layers. Put the dough back in its bag and into the fridge for at least half an hour and up to two hours. If you leave it for too long, there is a risk that the butter will go very hard and break up into flinty pieces when you next roll the dough. This can be remedied by allowing the dough to warm up a little before rolling. But the problem is usually to keep the dough cool enough to stop the butter melting. If it does, it will not form proper layers. The other reason for keeping the dough cold is to control the rate at which the yeast is fermenting: you don't want it to be too lively at this stage because it is hard to create good dough-butter laminations with a puffy dough.
  • Roll the dough out again in the opposite direction to the previous roll and do another book turn. You now have 32 fat layers, which is the maximum desirable number for a croissant dough, according to the experts. Return the dough to the fridge for another half an hour or so to keep the butter firm.
  • The dough is now ready for its final roll. Roll it out to a thickness of about 5mm. Cut into equilateral triangles measuring 10-12.5cm. You can, of course, make your croissants smaller or larger, as you wish. Before you commit yourself to cutting the dough, mark out the triangles (or squares for pains au chocolat) to make sure that you are going to get about the right number. Rest the cut pieces for a few minutes to allow the gluten to become more extensible. To make a croissant, proceed as follows:
  • Grasp the apex of the triangle with one hand and the base with the other. As gently as you can--without tearing the dough--stretch the triangle until it is almost twice as long (from base to apex) as it was. Pick up the base in both hands and stretch it slightly outwards. You should now have something resembling the Eiffel Tower. Fold the edge of the base firmly over on itself and then, with the fingers of your left hand, grasp the tope of the tower but keep it close to the worktop. Gently pulling with the left hand, roll up the croissant towards the tip with the right hand, keeping it under slight tension as you roll. This helps to create further layers of dough; more importantly, by putting the gluten under some tension, it creates a structure that will prove up into a bold, lively and flaky croissant. Place on parchment-lined baking trays in such a way that the tip of the croissant is held down under the weight of the body; if you leave it showing, it may unravel during proof or baking. Turn the 'claws' inwards slightly to form the classic croissant (crescent) shape.
  • Brush carefully with beaten egg, ensuring that there are no unsightly tide marks round the edges. Cover and set to prove in a place that is not so warm that there is any danger of the butter melting. If it does, you will see disappointing puddles of butter oozing from your croissants as they bake; and if the butter is visible, it certainly won't be doing its job between the layers of dough.
  • After sufficient proof, the croissants should be appreciably bigger and the finger test will tell you that their structure has become puffy and decidedly fragile. Bake them in a fairly hot oven (200°C; 400-425°F) for about 15 minutes, until they are golden brown.
  • To make pains au chocolat, cut the prepared croissant dough not into triangles, but into rectangles about 10 x 5cm. Place a generous stick of chocolate along one short edge and roll the dough up around it. Pinch the ends together to stop the chocolate flowing out during baking. Egg wash, prove and bake as for croissants.

Monday, May 4, 2009

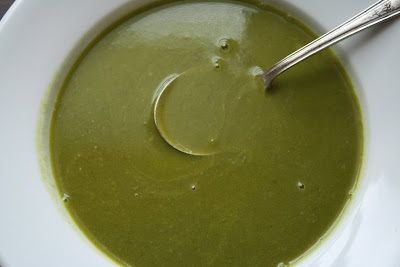
Ramp Soup

Last spring I kept on running into recipes involving ramps. I had never heard of ramps. By and by I learned that ramps are wild leeks possessing a flavor all their own, but I couldn't find them anywhere until last Saturday. It was the first day of our outdoor Farmers Market and at one of the stalls, among the baby greens, were ramps. I was delighted to find them and curious to try them in ramp soup.
I told my mom about my find and she told me that one of her dear friends grew up in West Virginia eating ramps and that on more than one occasion this friend's little sister was asked to leave the classroom for smelling too strongly of them. They are indeed pungent little bulbs, which make a lovely, oniony, spring soup. This soup is perfect for a first course, though I made a meal of it with chicken liver pâté on toast.

Ramp Soup

Gourmet, April 2008

  • 1 lb. ramps
  • 1/2 sweet onion, such as Vidalia or Walla Walla, thinly sliced
  • 1/4 tsp. pepper
  • 2 Tbs. oil
  • 1/3 cup dry white wine
  • 3 1/2 cups broth
  • 1/4 cup Parmigiano-Reggiano, grated
  • 2 Tbs. butter
  • Wash and trim roots from ramps. Cut off their tops and coarsely chop enough greens to measure 3 cups. Thinly slice ramp bulbs, including pink stems.
  • Cook ramp bulbs, onion, pepper, and 1/2 tsp. salt in oil in a large heavy saucepan over medium heat, stirring occasionally, until softened, about 10 minutes. Add wine, then boil over high heat, stirring occasionally until the wine has evaporated. Add broth and simmer, partially covered, stirring occasionally, until onions and ramps are very soft, about 20 minutes. Stir in ramp greens and boil 1 minute.
  • Working in batches, purée soup in a blender until very smooth, about a minute per batch. Strain through a fine-mesh sieve, pressing hard on and then discarding the solids. Return soup to a clean pot and bring just to the boil. Whisk in cheese and butter until smooth. Season with salt.

Sunday, May 3, 2009

BFF

Somedays it feels like I spend more time washing dishes than I do cooking. They told me on the first day of culinary school that such would be the case. They were right. And my hands were beginning to show it all too much. So two days ago I bought myself a pair of rubber gloves and they have since become my new best friends.