Thursday, April 29, 2010

Lemon Macarons

If you made the cheesecake below, you might be wondering what to do with all those egg whites and all that leftover lemon curd. Maybe you already made lemon meringue tartlets. If not, you could try making macarons. I should warn you, though: if they work you'll be overcome with baking euphoria, if not... not. You decide whether it's worth the risk.
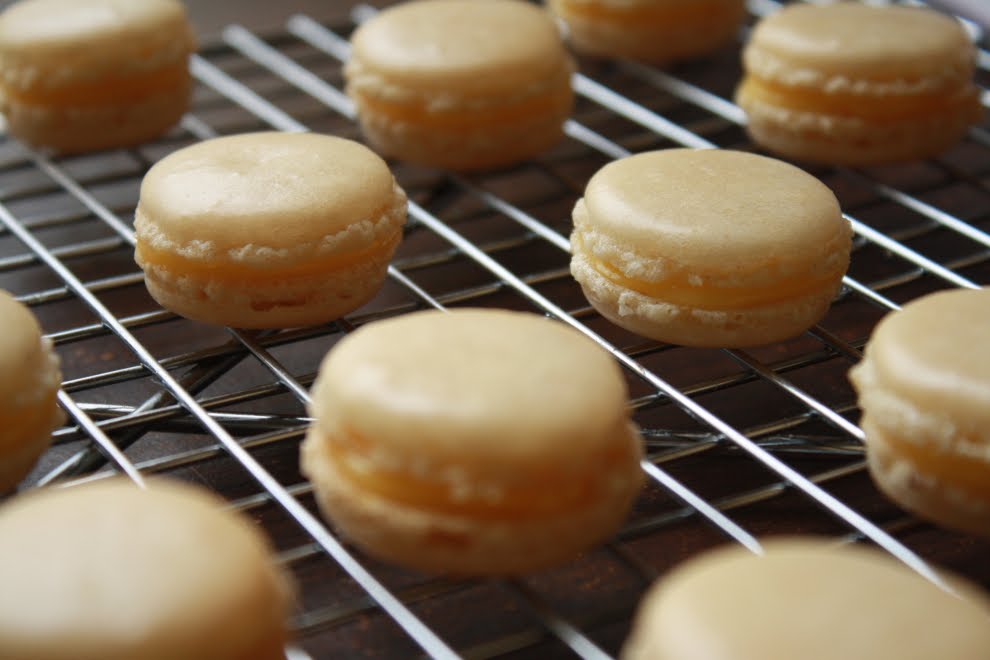
The first time I attempted to make macarons, it was a macaron massacre. I aged the egg whites like the recipe told me to and heated the syrup to so-many degrees before drizzling it down the side of the bowl while the whites were whipping and folded in the almonds and sugar just so and piped and waited and baked and then... they were lop-sided and hollow and just plain wrong. I was despondent for the rest of the day. This time I felt like I cheated somehow by making them with French meringue instead of Italian, but when I opened the oven and saw the perfectly shiny domes and frothy little collars, I didn't mind quite so much.
I hope your audience is as appreciative as mine was. I took my macarons to work with me and was positively regaled with praise. "They look like little hamburgers," S. said, "but taste like lemon meringue pie!" Another co-worker said, "I don't know what those are, but I want the recipe." Well, here it is.

Lemon Macarons

adapted from The Fundamental Techniques of Classic Pastry Arts

  • 115 g almond flour
  • 200 gconfectioners' sugar, sifted
  • 90 g egg whites, room temp
  • 8 g confectioners' sugar, sifted
  • 1/2 tsp. almond extract
  • lemon curd
  • Line a baking sheet with parchment or a silicone mat and set aside.
  • Place the almond flour and 200 g sugar in a food processor and process for about a minute. Set aside.
  • Place the egg whites in the bowl of a stand mixer fitted with the whisk attachment and beat on low until whites are foamy. Add the sugar and beat on high to the soft peak stage, being careful not to over-whip.
  • Remove bowl from stand and fold in the almond mixture and almond extract using a rubber spatula. Transfer batter to a pastry bag fitted with a medium round tip.
  • Pipe rounds of batter onto the parchment lined baking sheet, leaving enough room between them for the batter to spread slightly. Make the rounds any size you want so long as they're all the same size. If it helps, you can even draw circles on the parchment as guides.
  • Let the uncooked macarons sit for about an hour before baking. They will form a skin, which will help them keep their shape during baking. Preheat the oven to 325°F. Bake for about 10 minutes, or until firm and just beginning to brown around the edges.
  • Immediately transfer macarons to wire racks to cool. Once cool, pipe a mound of lemon curd on half the macarons and sandwich them with the other half, pressing them together to squeeze the filling to the edges.

Tuesday, April 27, 2010

Sour Cream Lemon Curd Glazed Cheesecake

I love lemon curd: lemon curd on toast, lemon curd tarts, lemon curd cream puffs, just a spoonful of lemon curd on a particularly sunless day. Or how about using lemon curd to decorate a cheesecake? I rescued several Meyer lemons from the reduced bin a couple weeks ago and they were still languishing in my fridge last weekend so it was obvious, I had to make lemon curd. And since Y. gave me this box which had once contained cheesecake and was sadly empty, I decided to restore it to its former glory and to return it to him holding cheesecake once more.

Cheesecake with sour cream lemon curd glaze

  • For the lemon curd:
  • 6 Tbs. butter
  • 2 whole eggs
  • 1 egg yolk
  • scant 1/2 cupsugar
  • 1/2 cup lemon juice
  • zest of 1 lemon
  • blank
  • For the crust:
  • 2 cups digestive biscuit or graham cracker crumbs
  • 1/4 cup confectioners' sugar, sifted (optional)
  • 6 Tbs. melted butter
  • blank
  • For the filling:
  • 1 1/4 lbs. cream cheese
  • 1/2 cup sugar
  • 3 whole eggs
  • 3 egg yolks
  • 1 1/2 tsp. vanilla
  • 1 1/2 tsp. lemon juice
  • 1 pinch salt
  • blank
  • For the glaze:
  • 1 1/2 cups sour cream
  • 2 Tbs. sugar
  • 1/2 tsp. vanilla
  • 1 pinch salt
  • lemon curd from above
  • For the lemon curd: Melt butter over medium-low heat in a heavy-bottomed pot. Add sugar and lemon juice and stir until sugar is dissolved. Beat together the eggs and the yolk. While mixing, pour a bit of the butter mixture into the eggs. Strain the egg mixture back into the butter mixture. Return to heat, reduce heat to low, and whisk constantly until curd forms. Pour into a baking dish, lay plastic wrap over the surface, and refrigerate until cold before using.
  • If you are going to bake your cheesecake in a hot water bath, which is recommended but not absolutely necessary, wrap an 8- or 9-inch spring form pan twice in heavy duty aluminum foil. Set aside.
  • For the crust: Combine the cookie crumbs and sugar if using. Add the melted butter and mix with a fork until all the crumbs are wet. Press into the bottom of the wrapped (or not) spring form pan. Refrigerate while you make the filling.
  • Preheat oven to 350°F.
  • For the filling: In a stand mixer fitted with the paddle attachment, mix the cream cheese on low speed until it is smooth. Add the sugar and mix to combine. Add the eggs and yolks one at a time, mixing well after each addition. Add the vanilla, lemon juice, and salt and mix until smooth. Pour filling onto the chilled crust. If using the water bath method, put the cake pan into a roasting pan and pour recently boiling water into the roasting pan until it comes about half way up the cake. Either way, bake for about 50 minutes.
  • Allow cake to cool to room temperature. Heat oven to 400°F.
  • For the glaze: Combine sour cream, sugar, vanilla, and salt and mix until very smooth. Pour over the cooled cake and level with an offset palette knife. Pipe the lemon curd in concentric circles on top of the sour cream mixture. Starting from the center and working outwards, pull a skewer through the circles of lemon curd. Repeat around the cake until you have formed a sunburst. Place in oven for 5 minutes. Remove cake from oven and allow to cool before refrigerating for several hours.
  • Allow cake to stand out of the fridge for a while before serving.
I adapted this recipe from Nigella and the Joy and my own experience. I had always before made lemon curd in a double boiler, but Nigella gave me the courage to do it in a pot directly on the burner. I didn't have a roasting pan large enough to hold my spring form pan, but if you do I highly recommend baking your cake in a hot water bath. Custards, and what is cheesecake if not a very, very thick custard, do appreciate that sort of treatment. Above all, though, don't stress or rush (which might mean making the curd a day or two ahead), and enjoy this creamy confection with people you love.

Tuesday, April 20, 2010

Pâte à Choux

I have long wanted to make a Croquembouche, one of those divine towers of caramel coated cream puffs crowned with spun sugar. Having never before so much as attempted a pâte à choux, I thought that was a good place to start. I chose Paula Peck as my guide and, true to form, she did not let me down. They turned out so well, I'm sorry now I didn't have the forethought to make a crème pâstissière. Next time.
You can use pâte à choux to make cream puffs, of course, or éclairs or profiteroles or a croquembouche or cheese puffs or any number of pastries sweet or savory. I did not put any sugar in my pâte à choux, but I'm sure you could if you want to push your puffs to the sweet side.

Pâte à Choux

adapted from Paula Peck's The Art of Fine Baking

  • 1/2 cup butter
  • 1 cup water
  • 1 cup sifted flour
  • 1/4 tsp. salt
  • 1/2 tsp. sugar (optional)
  • 4 eggs
  • Preheat oven to 375°F. Line baking sheet(s) with parchment or silicone mats and set aside
  • Combine flour, salt, and sugar (if using) and set aside. Put butter and water in a medium saucepan over medium heat. Cook until the butter is melted and the mixture comes to a boil. Reduce heat to low. Add the flour mixture all at once and stir vigorously for 3-5 minutes. The mixture will pull away from the sides of the pan and form a dough.
  • Remove from heat and transfer dough to the bowl of a stand mixer. Using the paddle attachment beat the dough on low speed for about a minute. Increase the speed and add 3 of the eggs one at a time, beating well after each addition. Lightly beat the fourth egg and add gradually to the dough. Beat until the dough is smooth and shiny.
  • Transfer dough to a piping bag fitted with either a round or star tip, depending on the look you're going for, and pipe dough according to what you're going to use it for.
  • Bake until puffs are golden brown and show no signs of moisture, 40-50 minutes for two-inch puffs. Turn the oven off and leave the puffs in the oven for an additional 15 minutes.
It's an odd process, making pâte à choux, but worth its strangeness for the delight of seeing beautifully puffed pastries when you open the oven.

Sunday, April 11, 2010

A Venison Salami Experiment, Part One

Step one: make the sausage--not a difficult process, but one that has taken me five months and approximately five and a half hours to accomplish. The first four months consisted of gathering the necessary starters and salts and sugars and cetera and of thinking that I really should grind the pounds and pounds of venison sitting in a garbage bag in my freezer. And then one day I did grind the pounds and pounds of venison and put them back in the garbage bag and back into the freezer. Another month went by and then today I spent four and a half hours regrinding the meat, grinding the fat, mixing everything together, stuffing said mixture into hog casings and finally tying them with string. The sausages are back in my freezer now awaiting transport to the dehydrator. Hopefully it won't take another month for them to get there.
If you decide to embark on a similar enterprise, let me offer you these small pieces of advise. One, don't do this alone. Second, don't use the KitchenAid meat grinding/sausage stuffing attachments. Yes, they do work, but not particularly well or efficiently. Third and lastly, really, don't do this alone. You'll want the company and the extra hands, promise.

Wednesday, April 7, 2010

Scones

I had my parents over for tea on Sunday. I baked scones and served them with orange marmalade and whipped crème fraîche. There were daffodils on the table and macaroon nests complete with speckled chocolate eggs. It was a lovely event, all in all, except that I was disappointed with the scones I served and the crème fraîche I had made before my trip to Israel had become a little too sour. I've always had a bit of a scone complex the way other people have anxiety about pie crust or curdling custard. I was determined to kick it today and, with the help of The Fundamental Techniques of Classic Pastry Arts, I think I did.
After some initial concern that my dough was too dry, my scones came out flaky, like they're supposed to, and golden and tender and just begging for a dollop of clotted cream.

Currant Scones

adapted from The Fundamental Techniques of Classic Pastry Arts

  • 325 g bread flour
  • 45 g sugar
  • 20 g baking powder
  • pinch salt
  • 110 g butter, cold, cut into pieces
  • 100 g dried currants
  • 1 large egg, room temp.
  • 1 egg yolk, room temp
  • 100-145 mL heavy cream
  • Preheat oven to 350°F. Line a baking sheet with parchment paper or a silicone mat and set aside.
  • Combine the flour, sugar, baking powder, and salt. Drop in the butter and cut it into the flour using a pastry cutter until the mixture forms pea-sized pieces. Avoid over cutting the butter, or your scones will be dense not flaky.
  • Lightly beat together the egg and yolk in a measuring cup. Pour in enough cream to bring the mixture to 200 mL. Stir to combine the eggs and cream. Add the egg mixture to the dry ingredients and mix just until a dough forms.
  • Lightly flour a work surface and turn the dough out onto it. You might have to give the dough a brief knead to bring it together. Lightly pat the dough until it is about an inch thick. Using a round, fluted biscuit cutter, cut out scones and place them on the prepared baking sheet. You can of course cut the scones into the shape of your choice. Brush with either a cream or egg wash and sprinkle with coarse sugar if you like (I happen not to). Bake in the preheated oven 15-25 minutes or until scones are nicely browned on the bottom and edges. Serve immediately.
They say the doom of things like scones in overhandling and they're probably right, but don't be afraid of handling them at all. If your dough is quite dry, as mine was, it might take a knead or two to bring the dough together. Give your dough what it needs and you can't go too far wrong.
I'm glad to have overcome my scone making anxiety. They're supposed to be one of those things you can whip up when someone drops by and offer with a comforting cup of something hot. I might not be a that point yet, but with practice I will be.

Friday, April 2, 2010

Braided Cardamom Loaves

It's just about Easter again and if you don't feel like making hot cross buns for your Sunday brunch, may I suggest you bake up a few braided cardamom loaves. I got the recipe from the current Saveur (thank you, Dad, for the subscription), where they say this bread is eaten with coffee or tea in Finland. There is no reason it cannot be eaten with coffee or tea in the comfort of your own home.
In the comments section of this recipe in the online version of Saveur there is some question about the amount of flour called for. I used the 6 1/2 cups in the recipe and had no problems. I think what it comes down to is properly measuring your flour. You'll want to fluff up your flour, spoon it into the measuring cup until it is slightly overflowing, and then even it off with the back of a knife. Don't, under any circumstances, scoop up the flour with the measuring cup--it will become too compact in the cup and, yes, it'll seem like the recipe calls for way too much flour. This is why I prefer recipes that give quantities by weight. No questions there.
The recipe says it yields two loaves, but I divided the dough farther to make six 8-ounce loaves. If you choose to do the same, check your loaves after 15 minutes and give them a bit more time if needed. My first batch needed 20 minutes and my second batch had just started to get a bit too brown after the same amount of time. In any case, these smaller loaves are ideal for tying up in colored string and giving to your neighbors (or your mother's neighbors, in my case). If you have any leftover I have a feeling they'd make a star bread pudding or scrumptious French toast.