Monday, April 27, 2009

(Very) Wide Pasta with Fiddleheads and Parmesan...and Kippers

At work today people kept on buying fiddleheads. Fiddleheads! Fiddleheads are one of the surest signs of Spring around here. And we had them. And people were buying them. And I wanted some. The first thing I did on my lunch break was eat lunch, but the very next thing I did was head directly to produce and look for the large, black, plastic garbage bag I knew had to be somewhere containing fiddleheads. I found it and wasted no time procuring for myself some of the springtime gems.
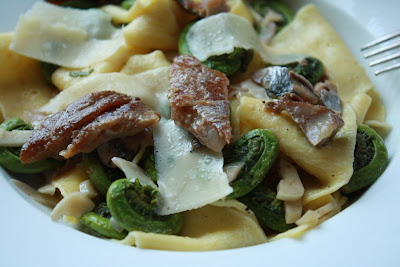
I knew exactly what I wanted to do with them. I wanted to saute them with lots of butter and garlic and sea salt and black pepper and toss them with fresh pasta. That is exactly what I did and it was divine. There was a hand written note complete with exclamation point attached to the large, black, plastic garbage bag, though, urging people to boil or steam their fiddleheads for 15 minutes before eating them. I headed this advice, steaming my fiddleheads for 10ish minutes, figuring they'd get a few more minutes of cooking in the saute.
As for the pasta, I had seen a recipe for seven-yolk pasta on Smitten Kitchen and wanted to try it. Thing is I only had two eggs and was only cooking for one. There are some recipes that should not be quartered and pasta is probably one of them, but I tried anyway and succeeded. I started with 2 ounces of flour, cracked one egg in the well and added another yolk. My dam quickly broke, but I managed to patch it before adding a teaspoon each of olive oil and milk. I whisked the eggs with my fingers, adding the flour a little at a time. What I was left with was very, very wet so I added more flour a soup spoon at a time until it resembled dough. I probably ended up adding at least another 2 ounces of flour if not a bit more. I kneaded it briefly and then set aside the dough to clean up my work surface. Once it was clean I dusted it again with flour and kneaded my dough for another ten minutes, adding more flour, until it was silken. I wrapped it tightly in plastic and let it sit for half an hour.
Don't let anybody tell you you have to have a pasta roller to make pasta. Which isn't to say I don't want one, but I rolled mine out with my new, beautiful rolling pin with no trouble, even managing to get it as thin as I wanted it. To cut it I simply dusted it with flour, folded it up a few times and used a knife to cut it to the desired width. I made eight noodles, which ended up being the perfect amount to feed two (and somehow I was able to restrain myself and ate only half of it).
In the past I have had trouble knowing when fresh pasta is cooked and have often taken it off the boil prematurely. Tonight I managed to cook it to perfection. Three times I tried it and three times I said, "Just a little bit longer." The fourth time I tested it, it was done. So clearly, so obviously done. So wait. You really can tell when it is cooked properly.
I took my perfectly cooked noodles and added them to the pan containing the fiddleheads, garlic, butter, salt and pepper and tossed everything together before putting it in my bowl. I shaved a few pieces of Reggiano Parmesan (billed as the "Ferrari of the Parmesans" in our cheese department--how is a girl supposed resist that even at $15/lb?) on top with a potato peeler and sat down to dinner. And then I remembered I had half a tin of kipper snacks in the fridge and thought they'd be awfully nice with the fiddleheads and garlic and butter and salt and pepper and pasta and cheese. Which they were.

I Had To Tell Somebody

I just made the most perfect batch of yoghurt of my yoghurt-making career to date. I was reading Pat Katz and she said that it really is worth heating your raw milk up to kill some of the bacteria in it so they don't interfere with the bacteria you introduce to your milk. So I did. And the result was silky, thick, creamy yoghurt. I also added a cup of raw cream that had started to sour to my quart of milk. I'm sure that helped on the creamy front. But, yum, it's all I can do not to eat the entire pint right now.

Monday, April 20, 2009

The Press that Launched a Thousand Projects

I go to Hospice (actually, Experienced Goods, a thrift store that benefits Brattleboro area hospice) several times a week to see what's new. Often I leave empty handed, but sometimes I find gems. Like the tortilla press I scored last week for $2.50.
Obviously I was obligated to make tortillas. I went back to the Co-op, where I had just finished shopping, and picked up some masa harina. And a lime, just for good measure. I thought this tortilla press might also necessitate the purchase of lard so I went to the meat department fully expecting to be told that no, we don't sell lard and was not disappointed by the same helpful man who dashed my hopes of buying suet at Christmas. I had asked about duck fat a few days previously and got the same response.
I got home with my press, my masa harina, and my lime and looked up a recipe for refried beans. I was right. I did need lard (the recipe offered duck fat as an alternative). And beans. I knew I could get black beans at the Co-op, but lard, where was I going to get lard? I called the other local supermarkets. They didn't carry it either. I called a gourmet food store half an hour down the road and asked if they sold duck fat. I asked for duck fat because the chicken liver mousse recipe in the current Art of Eating that I've been wanting to try calls for it and if I could use it in the beans too, well, two birds. The woman on the other end of the phone didn't know what I was talking about. "You want what!?" "Duck fat," I repeated, "Rendered duck fat. Y'know for cooking." "Oh. No. We don't sell that. We sell duck breasts?" She offered. I told her thanks anyway and called the kitchen store in Keene to see if they had any suggestions. They recommended I call Paul's. So I called Paul's and asked if they sold lard or duck fat. After some backing and forthing between the woman on the phone and the man in the meat department I was told that yes, they did sell duck fat. So I drove to Keene, found Paul's, and was told no, they didn't sell duck fat. What about lard? No. But they did have some frozen pork fat so I bought that deciding to render my own. I got home with my pork fat and realized that I had absolutely no idea where the fat had come from, if the pigs had been given antibiotics or hormones or what. So back to the Co-op I went and asked J. if I could have some scraps of fat from the pork he was trimming. And guess what, I got an affirmative response from the meat department!
I consulted Pat Katz's The Craft of the Country Cook on rendering lard and it came through with highly detailed instructions. The simplified version runs thus: Trim every iota of meat off the fat. Chop the fat into small pieces or run it through a meat grinder. Put a heavy-bottomed, high-sided pot over low heat. Add a few bits of the fat to the pot and when enough has begun to render that the fat doesn't stick to the pan add the rest of the fat. Stir the fat constantly. When enough has melted that the fat stirs easily increase the heat to medium and continue to stir frequently. The fat will start boiling and sputtering as the water evaporates. When the temperature reaches 255 F, rendering is complete. You can also use the cracklings as indicators. These bits of membrane will start to show when rendering is complete. When the floating cracklings turn light brown, rendering can be stopped and when they start to sink to the bottom the pot should be taken off the heat. Allow the fat to sit for a little while to let the sediment settle. Dip the clear fat off the top into containers and strain the rest through a cloth lined colander. Or strain the whole amount. Store in small containers, leaving as little airspace at the top as possible. Also protect lard from light. Rendered fat that has had all the water removed from it will keep in a cool place for months.
I used a cast iron pan and I think it turned my lard grey, so if you have an enameled pan use that instead. Otherwise, although my experience with lard is minimal, I think my fat rendered well.
I invited my dad over for tacos for Sunday dinner. I started my beans on Friday. I put a cup of beans covered with water and a tablespoon of whey up to soak in a warm place on Friday night. Saturday morning I simmered them for four hours with two cloves of garlic and a bay leaf, seasoned them with salt and pepper, and put them in the fridge. Sunday afternoon I mashed 2 cups of the cooked beans, melted 3/8 of a cup of lard in a cast iron pan, added the beans and stirred them until all the fat was incorporated. I corrected the seasoning and set them aside to reheat just before dinner.
And then I made tortillas.

Tortillas

makes about 15 tortillas

  • 2 cups masa harina
  • 1 tsp. salt
  • 1 1/4 cups plus 2-3 Tbs. water
  • 1 tsp. lard
  • Combine the salt and masa harina. Add the lard to the water and heat. Pour 1 1/4 cups of the water mixture into the masa harina and mix with a fork. It will probably look clumpy and be a bit dry. Add more water a teaspoon at a time and mix with your hands until the dough comes together. Be careful not to make it too wet.
  • Knead your dough for 1-2 minutes until it is smooth. Wrap tightly in plastic and allow to stand for half an hour.
  • Cut two pieces of parchment to fit between the plates of your tortilla press. Put a dry cast iron pan over medium-hight heat. Unwrap your dough and pinch off a golf ball-sized piece. Rewrap your dough. Roll the piece you have broken off into a ball. Place it on the parchment lined press and squash the ball slightly with your fingers. Place the other piece of parchment on the dough and then press. Carefully peel the parchment off your tortilla and then your tortilla off the parchment. Cook on the hot, dry pan until done. Place in a towel to keep warm. Repeat until all the dough has been used.
  • I found the my tortillas came off the pan stiff as boards, but became soft and pliable as they sat in the towel.

Tuesday, April 14, 2009

Leftover Yolk Custard

After making the macaroon nests in my previous post I was left with two forlorn looking yolks sitting in a bowl on the counter. I couldn't bear to see their golden goodness slip down the drain so I thought, "Aha! Custard."

Leftover Yolk Custard

Makes 3 individual custards

  • 2 egg yolks, left over from another recipe
  • 1 whole egg
  • 1 1/2 cups milk
  • 1/8 cup maple syrup
  • pinch salt
  • Beat together the yolks and the egg. Add milk, syrup, and salt and combine well. Strain into one large dish or a few individual dishes. Place custard dish(es) in another dish and fill with hot water so that water comes about half way up the custard dishes. Bake in a 300-degree oven for about half an hour or until a knife comes out clean. Custards should still be very jiggly in the middle--they will continue to firm up as they cool.

Sunday, April 12, 2009

Chocolate Truffles in Macaroon Nests

The thing I like most about holidays is the guilt-free excuse they provide to make things people might otherwise consider gluttonous. So, Happy Easter.
This was my first attempt at truffles and it will certainly not be my last. The amount of pleasure they deliver, the amount of awe they inspire in those who receive them far outweigh the effort put into them. And, having made them once and figured out better strategies along the way, the next time will be that much easier. For instance: don't try to scoop your ganache into truffle-sized blobs when it is just out of the fridge and rock hard. Rather, allow it to warm up a bit and then use your mellon baller instead of two inappropriately shaped tea spoons.

Truffles

makes 70-75 bite-size truffles

  • 1 recipe basic ganache
  • 2 Tbs. butter, softened (I used salted, but use unsalted if you prefer)
  • 1 cup Dutch-processed cocoa powder
  • 8 oz. semi-sweet chocolate, chopped or broken into pieces
  • Make the ganache and add the butter while the ganache is still warm and in the food processor. Process until smooth, about 10 seconds. Transfer to a bowl, cover tightly with plastic wrap, and refrigerate until firm (at least 2 hours or overnight).
  • Put the cocoa in a pie pan or other wide, flat dish and set aside. Allow the truffle mixture to warm up a bit and then, using a melon baller and your index finger, drop spoonfuls of the mixture onto a parchment-lined baking sheet. When all the truffles have been scooped, dip them in the cocoa and use your palms to roll the truffles into smooth balls. Put the truffles back in the fridge.
  • Melt the chocolate in a bowl set over barely simmering water, stirring occasionally. Remove the bowl from heat just before all the chocolate has melted and continue to stir until it melts all the way and is smooth.
  • Using two forks or your fingers, coat the truffles with the melted chocolate. Drop each coated truffle into the cocoa powder and then cover it with cocoa powder, letting it sit in the cocoa until the coating has firmed up before transferring it back to the baking sheet. Or roll them in nuts or another coating of your choice.
  • Let the truffles sit at room temperature for at least 15 minutes before serving. If not serving right away, store them in an airtight container in the refrigerator, where they will keep for up to 5 days.

Macaroon Nests

makes about 10 nests (or more cookies)

  • 2 egg whites, room temperature
  • pinch salt
  • 1 tsp. lemon juice
  • 3/4 cup sugar
  • 1 tsp. vanilla
  • 1/2 tsp. almond extract (optional)
  • 1-1/4 cups coconut, flaked or shredded
  • Whip the whites and salt until foamy. Add lemon juice and, beating on high, gradually add the sugar. Beat until a stiff meringue is formed. Beat in vanilla and almond extracts. Fold in coconut. Spoon batter onto parchment-lined baking sheets, making an indentation with a soup spoon if going for the nest effect. Bake at 300°F for 25 minutes or until macaroons feel dry to the touch.
And then you get to wrap them up with parchment and string and give them away to people who will ooh and aah and swoon with pleasure and disbelief that you actually made them, yes, even the truffles.

Friday, April 3, 2009

Moving. Again.

I'm moving again, so it's likely I won't post for a little while. But it's all for the good. No more roommates, the freedom to leave projects on the kitchen counter, and most probably an internet connection at home! So don't despair of me and check back in a couple weeks. E.